Everything, in order.
Twenty-one sections, from installing the plugin to the metadata that travels inside the file. Jump straight to the one you need.
Introduction
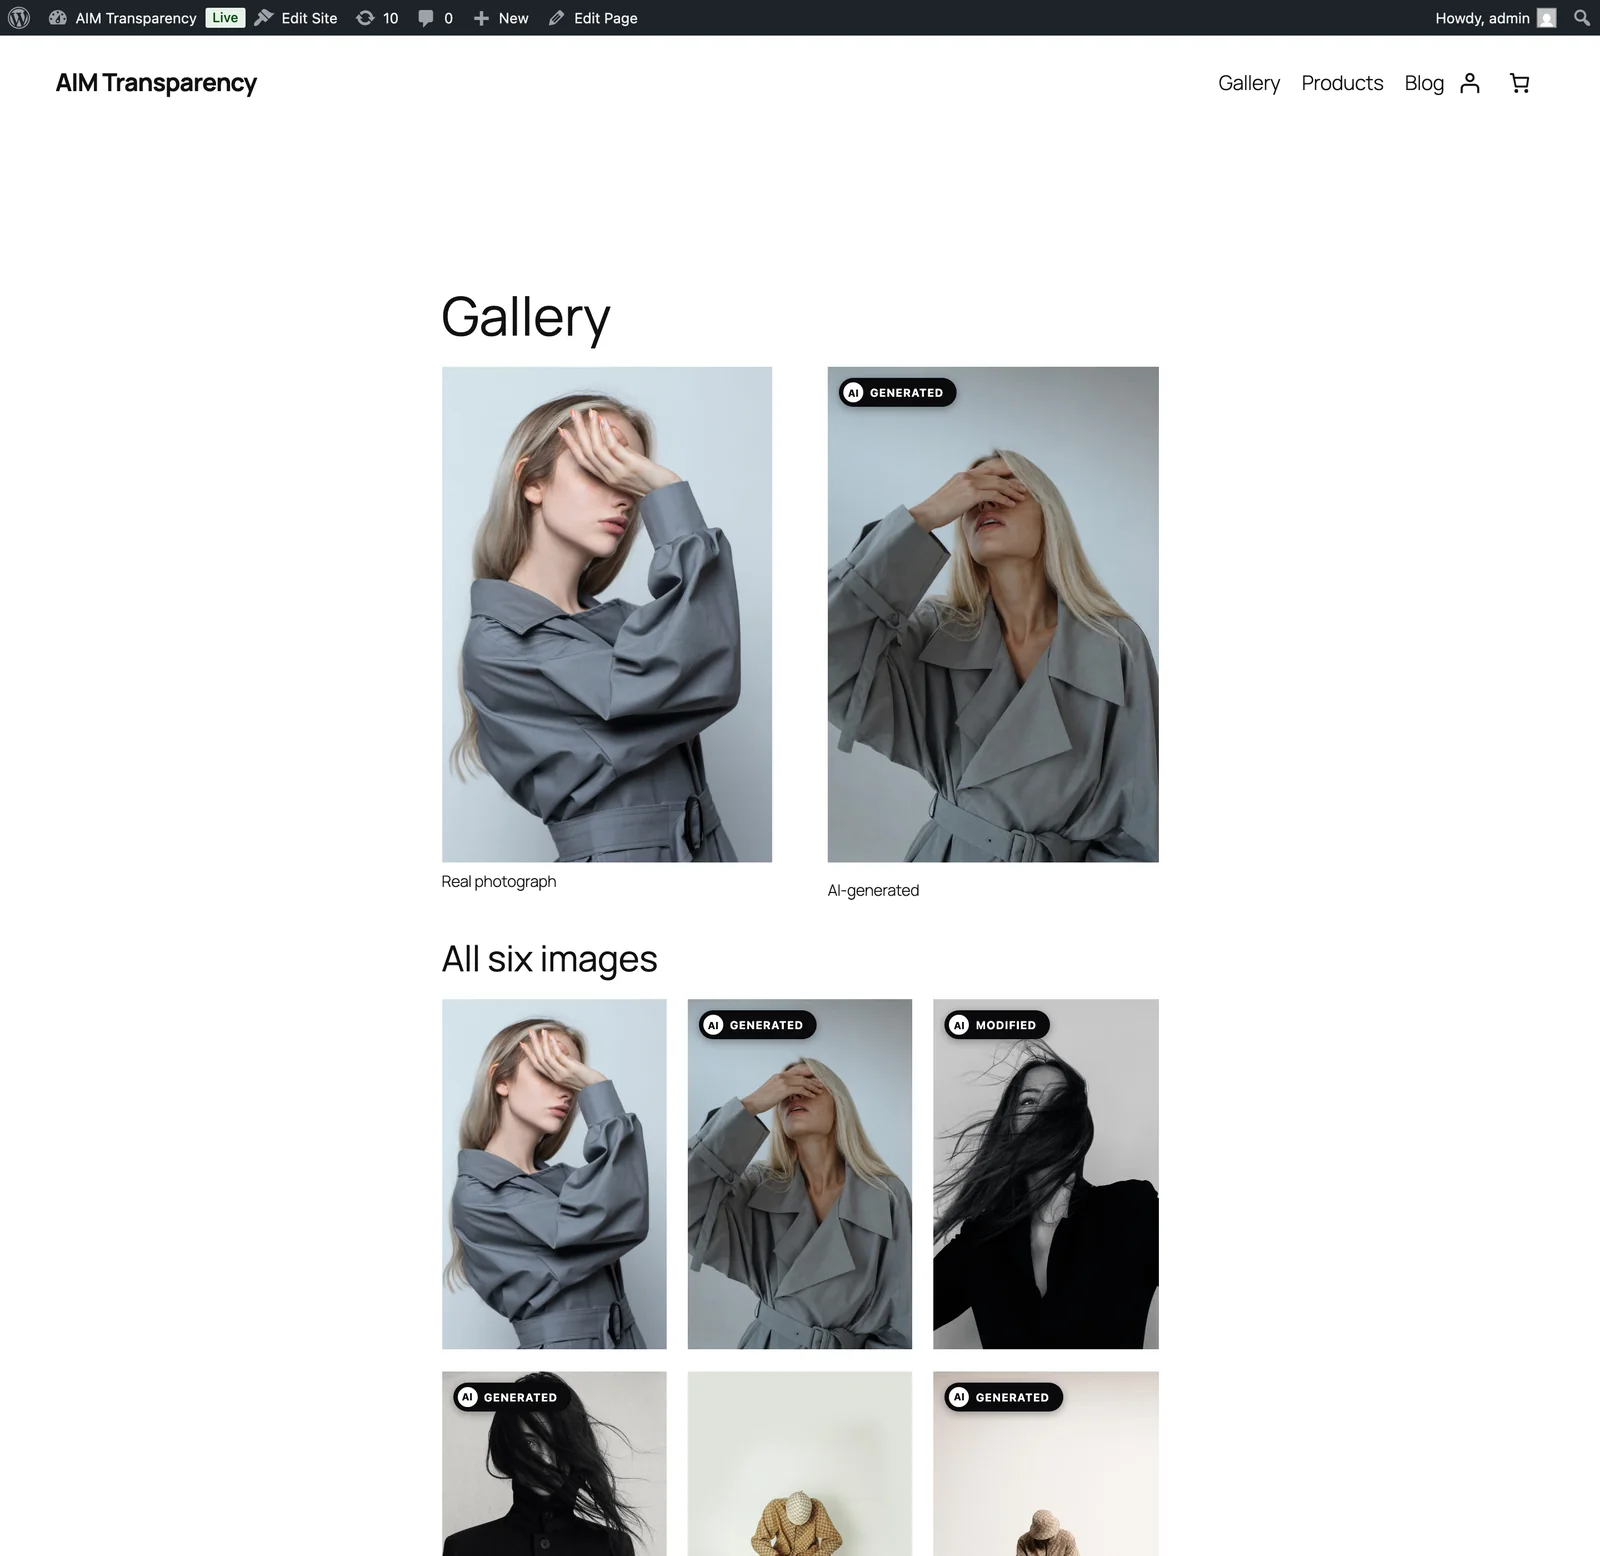
AIM Transparency labels the AI-generated images on your WordPress site. It adds three layers of disclosure so that both people and machines can tell the content was made or altered by AI:
- A visible badge: the official EU AI-content label (or your own design), shown on the page.
- Embedded metadata: the IPTC
DigitalSourceTypetag, written inside the image file itself. (IPTC is the standard news-media metadata format.) - schema.org JSON-LD: structured data added to the page so search engines and provenance tools can read it. (JSON-LD is a simple format for machine-readable data.)
It works with any theme, renders nothing visible until an image is flagged (a small stylesheet and script load with the badge feature), and never sends your data anywhere. The core plugin is free. Pro adds automatic flagging on upload, the library scanner (strip-guard + retroactive discovery) and formatted reports.

Installation
- In wp-admin, go to Plugins > Add New > Upload Plugin and upload the plugin ZIP file. (Or install it straight from the WordPress.org directory.)
- Activate it. A new top-level Transparency menu appears and opens on Overview, which tells you straight away what is already correct and what is not.
- Flag an image and you are done: the badge and the mark inside the file are both on by default. Everything else on this page is optional.
You don’t have to set anything up. It works out of the box. Everything below is optional fine-tuning.
The dashboard (Overview)
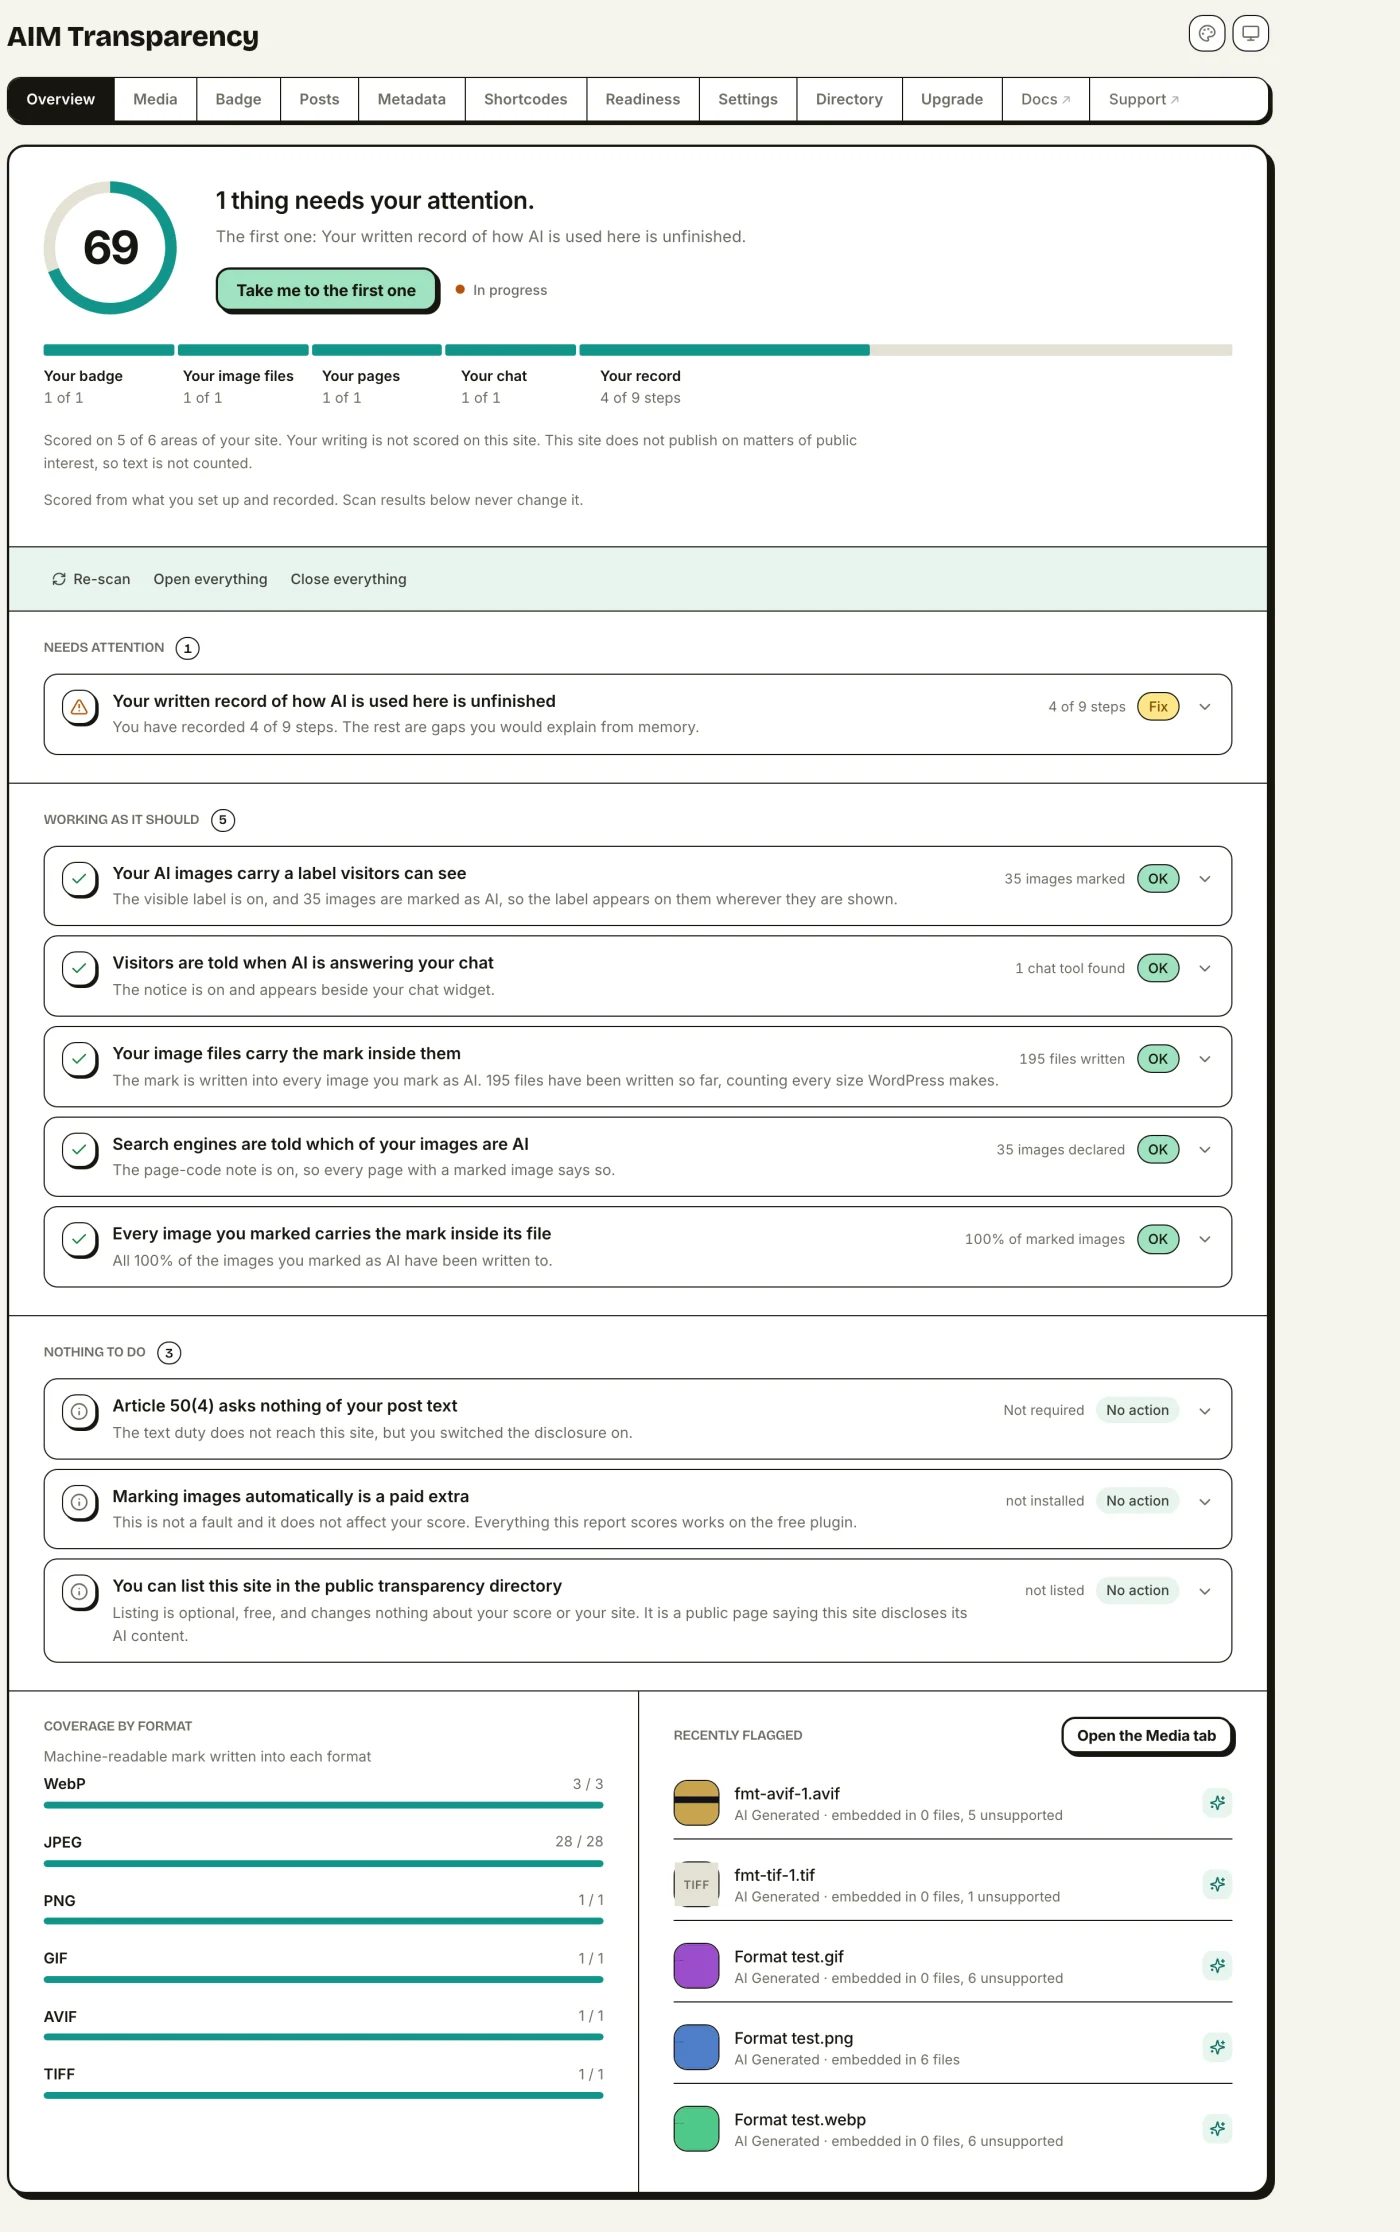
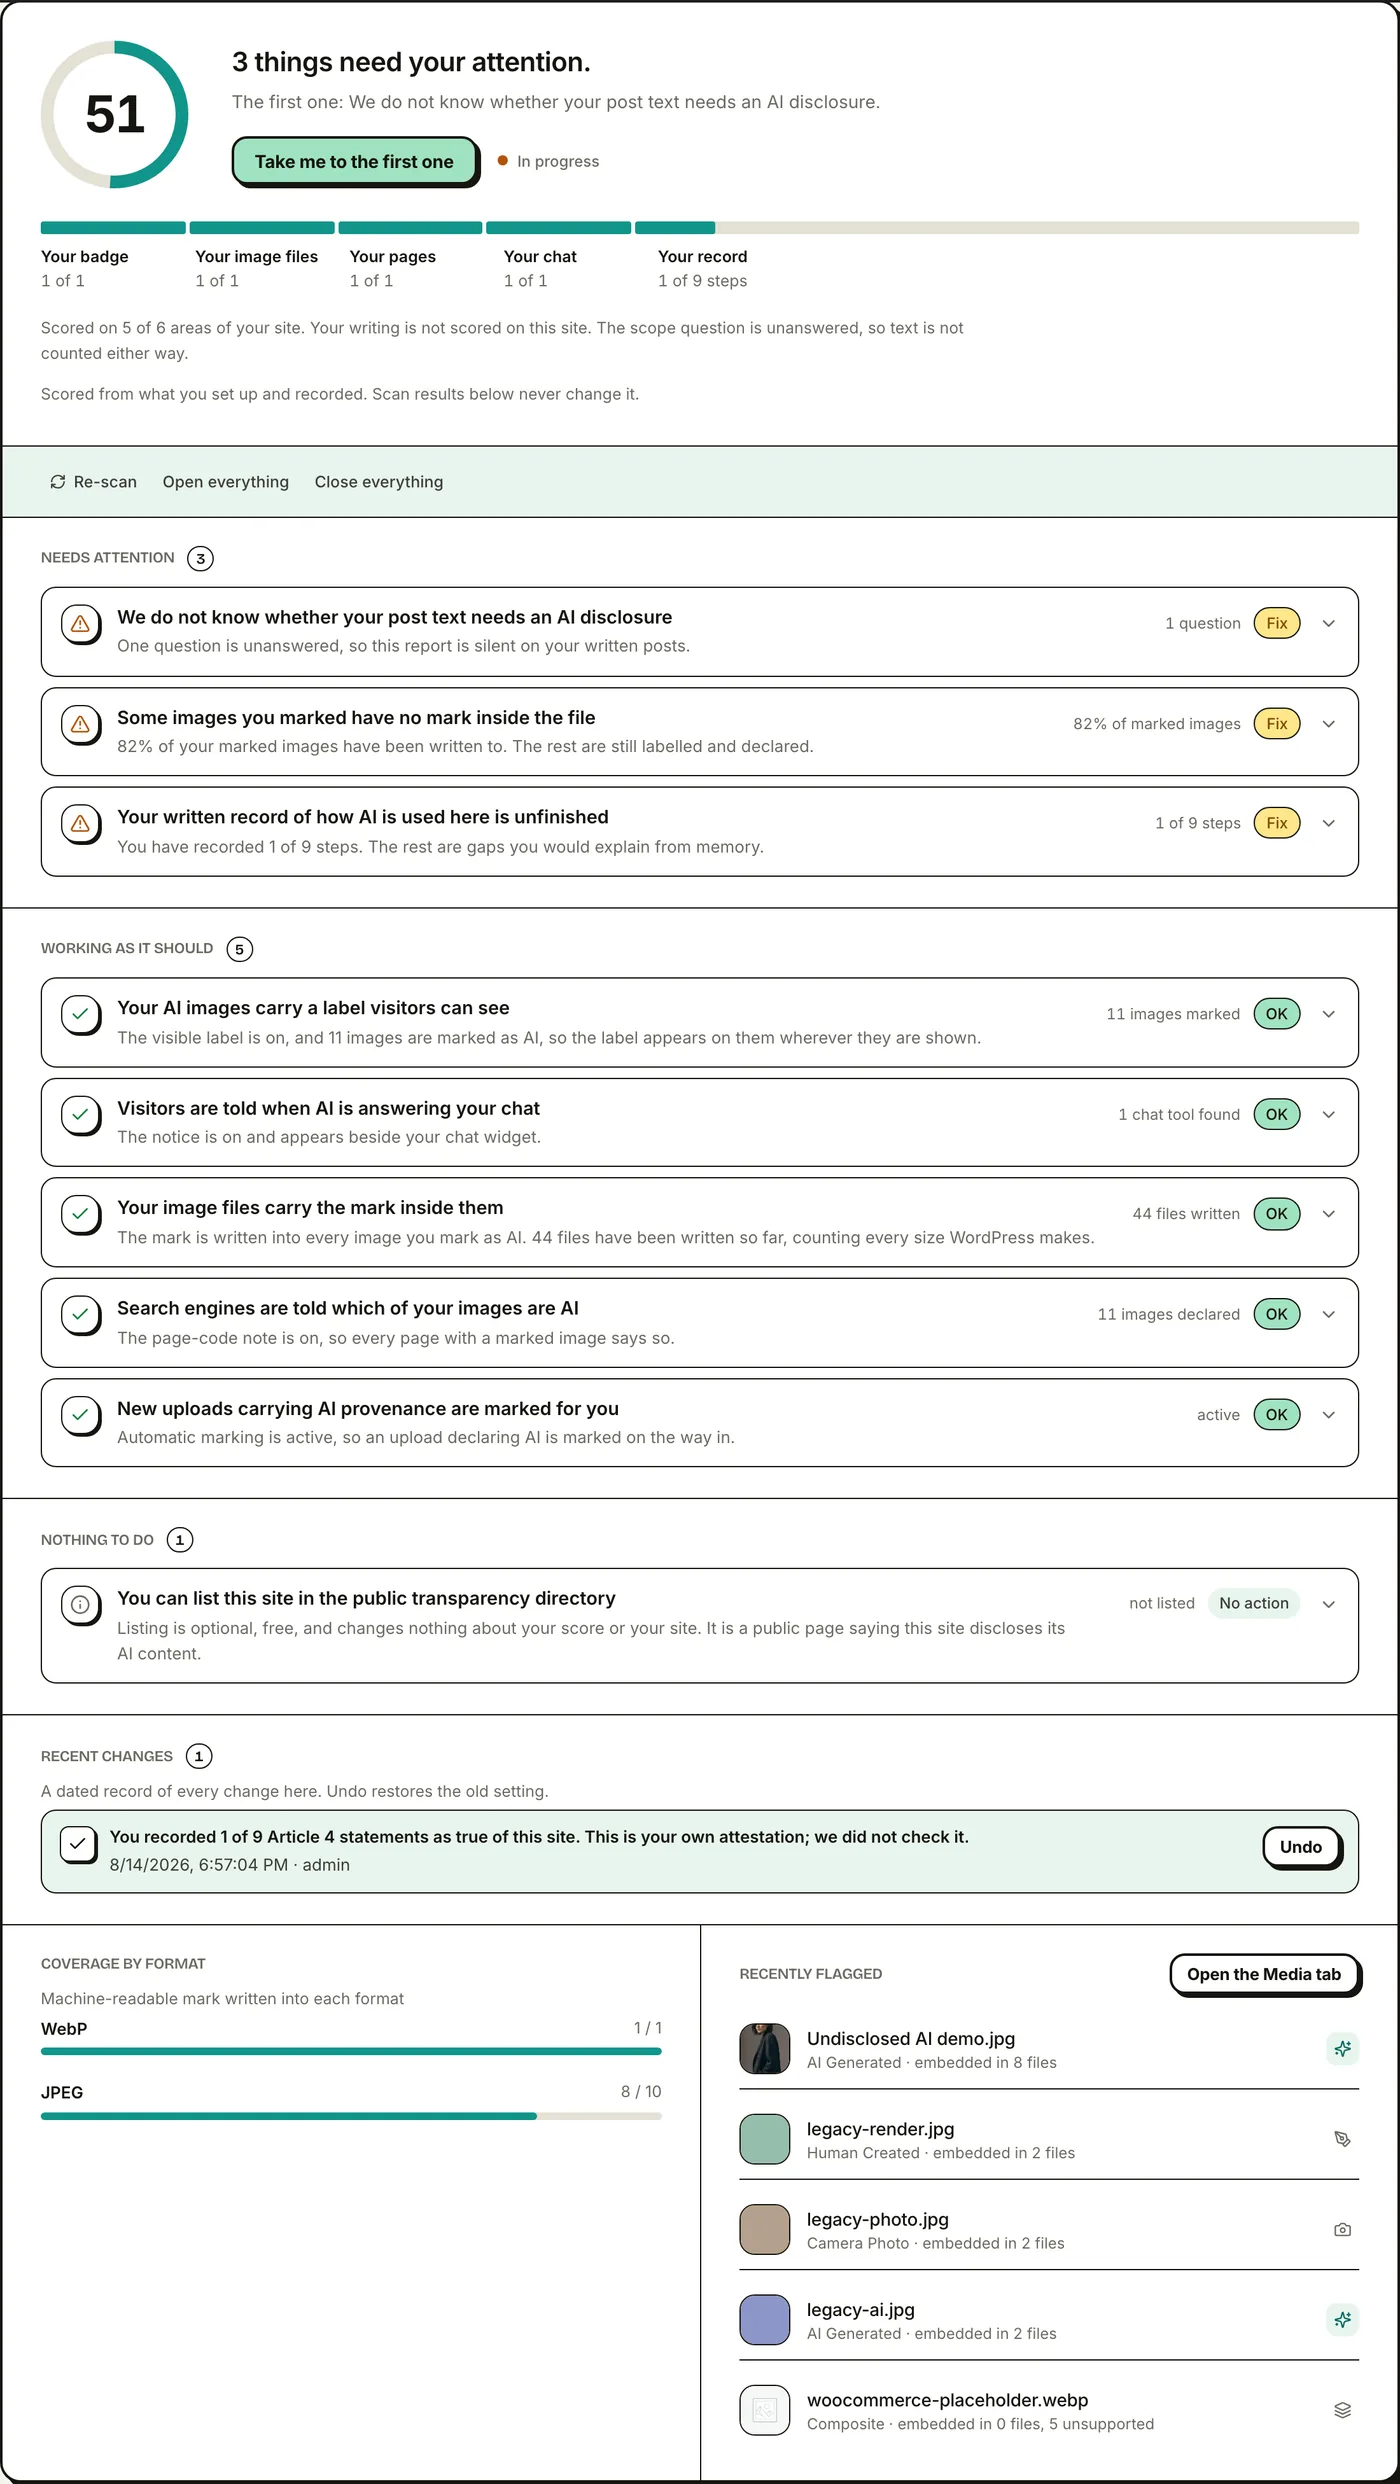
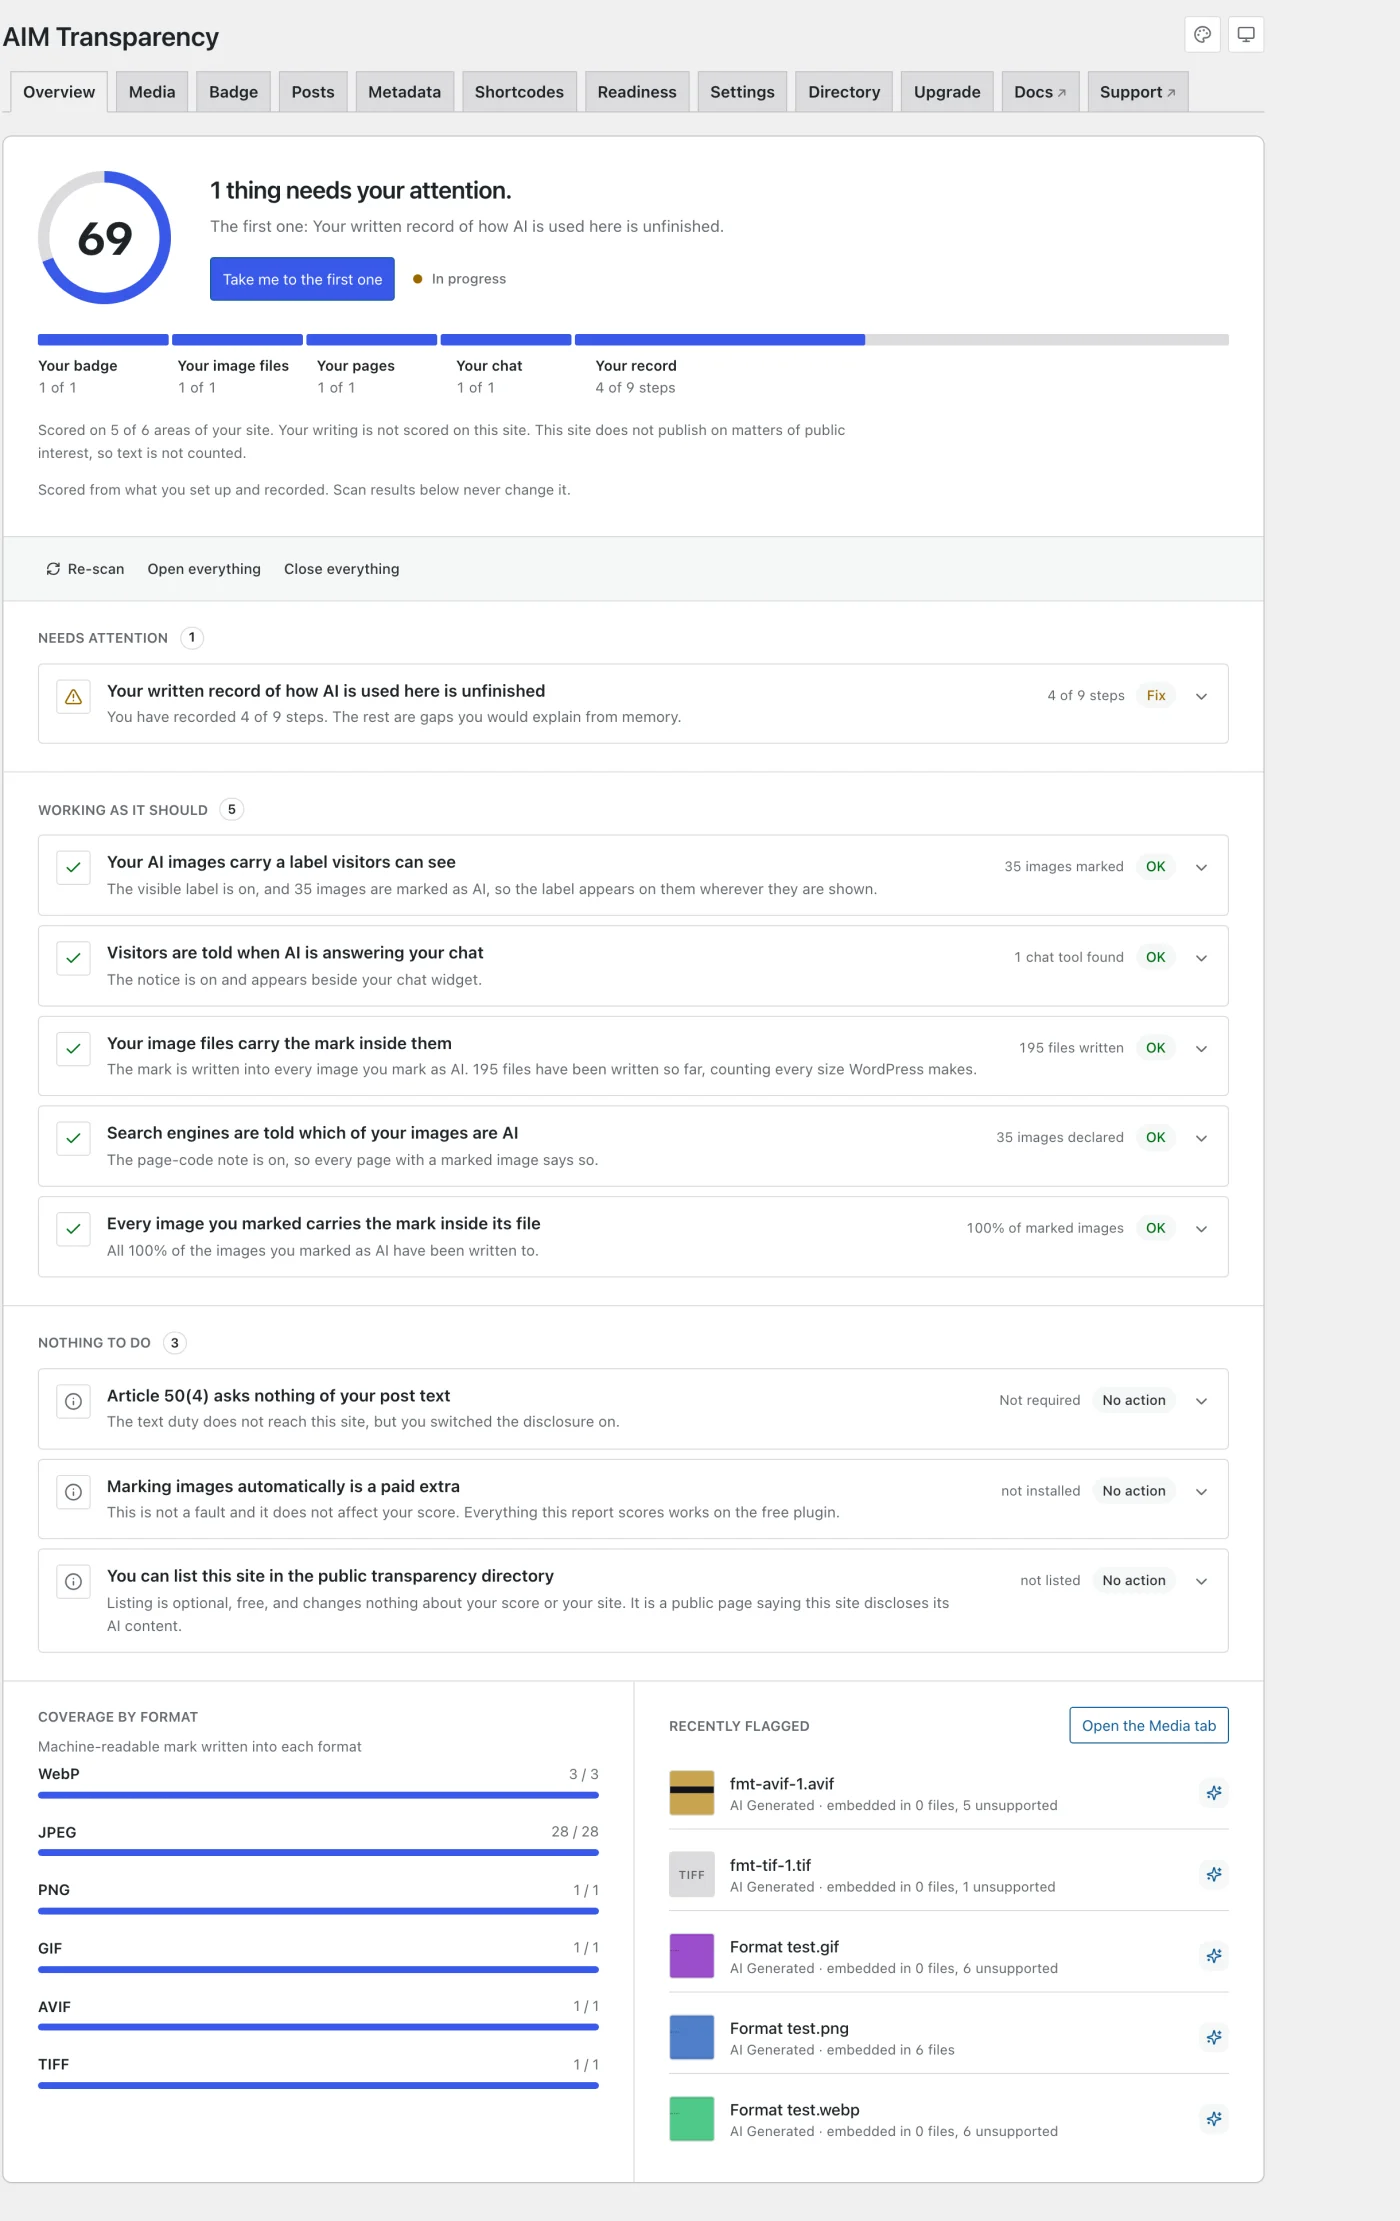
The Overview is the first screen under the Transparency menu. It is a report on your site that you can act on: every finding carries the action that resolves it, so you are not sent to another tab to do what the screen just told you needs doing.
The score, and the five bars under it
The number in the ring is your readiness score, and beside it is a plain sentence: how many things need your attention, and what the first one is. Take me to the first one jumps you straight to it.
The score is calculated only from what you have set up and recorded. Anything found by scanning your site is listed below it and never moves the number, so a scan result can never quietly mark you down. The five bars break the score into its parts:
- Your images: how many images have a source type recorded, out of the images in your library.
- Your image files: how many of the images you marked as AI actually carry the mark inside the file (Layer 2), not just the visible badge. This drops when an optimiser or a CDN strips the tag after it was written.
- Your pages: whether the schema.org JSON-LD note is being written on pages that show a marked image.
- Your chat: whether a chat tool found on your site has been disclosed, or declared as answered by people.
- Your record: how many of the nine Article 4 AI-literacy statements you have recorded.
Findings, sorted by what you owe them
Below the score, findings are grouped so a healthy site reads as healthy rather than as a wall of warnings:
- Needs attention: something is genuinely incomplete. Each row has a Fix button that performs the change there and then.
- Working as it should: what is already correct, with the figure behind it, so you can see why it passed.
- Nothing to do: optional things, such as listing your site in the public directory. These never affect your score.
- Recent changes: a dated record of every change made from this report, newest first, with an Undo beside each line that puts the old setting back.
Nothing on this screen asserts anything on your behalf. No image is ever marked as AI without you choosing that image, and the chatbot notice is never switched on until you have answered whether your chat replies with AI or with a person.
Coverage by format
A per-format breakdown (JPEG, PNG, WebP, GIF…) showing how many flagged images of each type actually received the embedded tag. It also shows at a glance whether any images are badge-only (visible badge present, but missing the embedded metadata).
EU AI Act readiness
A combined score of your Article 50 image disclosure (scored automatically from your settings) and your Article 4 AI-literacy checklist. Open it for the full Readiness view.
Detection (free)
Flagging is a decision you make per image, so the obvious question is “which images even need it?” Detection answers that, and the answers appear as findings on the Overview. Everything below runs on your own server. Nothing is sent anywhere, and it never guesses from pixels.
Images that look AI but are not marked
It reads the metadata already inside your unflagged Media Library files and surfaces the ones whose provenance reads as AI-generated: an IPTC DigitalSourceType of trainedAlgorithmicMedia, or one of 27 generator signatures written by the tool that made the file. These are images that arrived pre-marked as AI but that you have not disclosed. Each result links into Media so you can mark it in a click.
AI systems running on your site
It matches your site against a registry of 672 AI systems, and it looks in four places, not one: your active plugin list, the script addresses on your pages, the JavaScript a widget leaves in the browser, and the cookies it sets. A chat tool pasted into your theme, added through a tag manager or served from your own CDN is found the same as one installed as a plugin.
Matching is deliberately strict. A widget’s name mentioned in a blog post, quoted in an install tutorial, or sitting in a file name is not treated as that widget running.
Who actually replies in your chat
This is the part that matters most, and the part most tools get wrong. Not every chat widget is an AI. Tawk.to, Olark, Intercom and Crisp are live chat answered by people, with an optional bot. Telling your visitors they are talking to an AI while a colleague is typing is a false statement, and a worse one than saying nothing.
So every chat tool in the registry is classified by who actually replies, and the dashboard says one of three things:
- This one replies with AI. Article 50(1) applies and you should switch the notice on.
- This one can be either, depending on how you set it up. You are asked, and nothing is switched on until you answer.
- This one is answered by your team. Article 50(1) does not apply and no notice is added.
Nothing about your chat is ever declared for you. A wrong chatbot notice is a false statement to a visitor, so the plugin asks rather than assumes.
Which pages it reads
Widgets are routinely scoped to part of a site, so a home-page-only scan misses them. Detection reads up to six of your own pages: your home page, your most recently updated post and page, and, if you run WooCommerce, your shop and a product page. It keeps only the part of each page it needs, so it covers more ground while storing far less.
If a widget only appears somewhere else, such as a checkout or a members area, point the scan at it:
add_filter( 'aicl_scan_urls', function ( $urls ) {
	$urls[] = home_url( '/members/' );

	return $urls;
} );
When it cannot check
A server cannot always reach itself at its own public address. Local installs publish on a different port than the web server listens on, an origin behind a proxy often cannot resolve its own hostname, and some firewalls block a site from requesting itself. When that happens you get a plain explanation and a list of what was still checked, rather than a confident “you’re all clear”. A scan that could not run is never reported as a scan that found nothing.
Flagging images
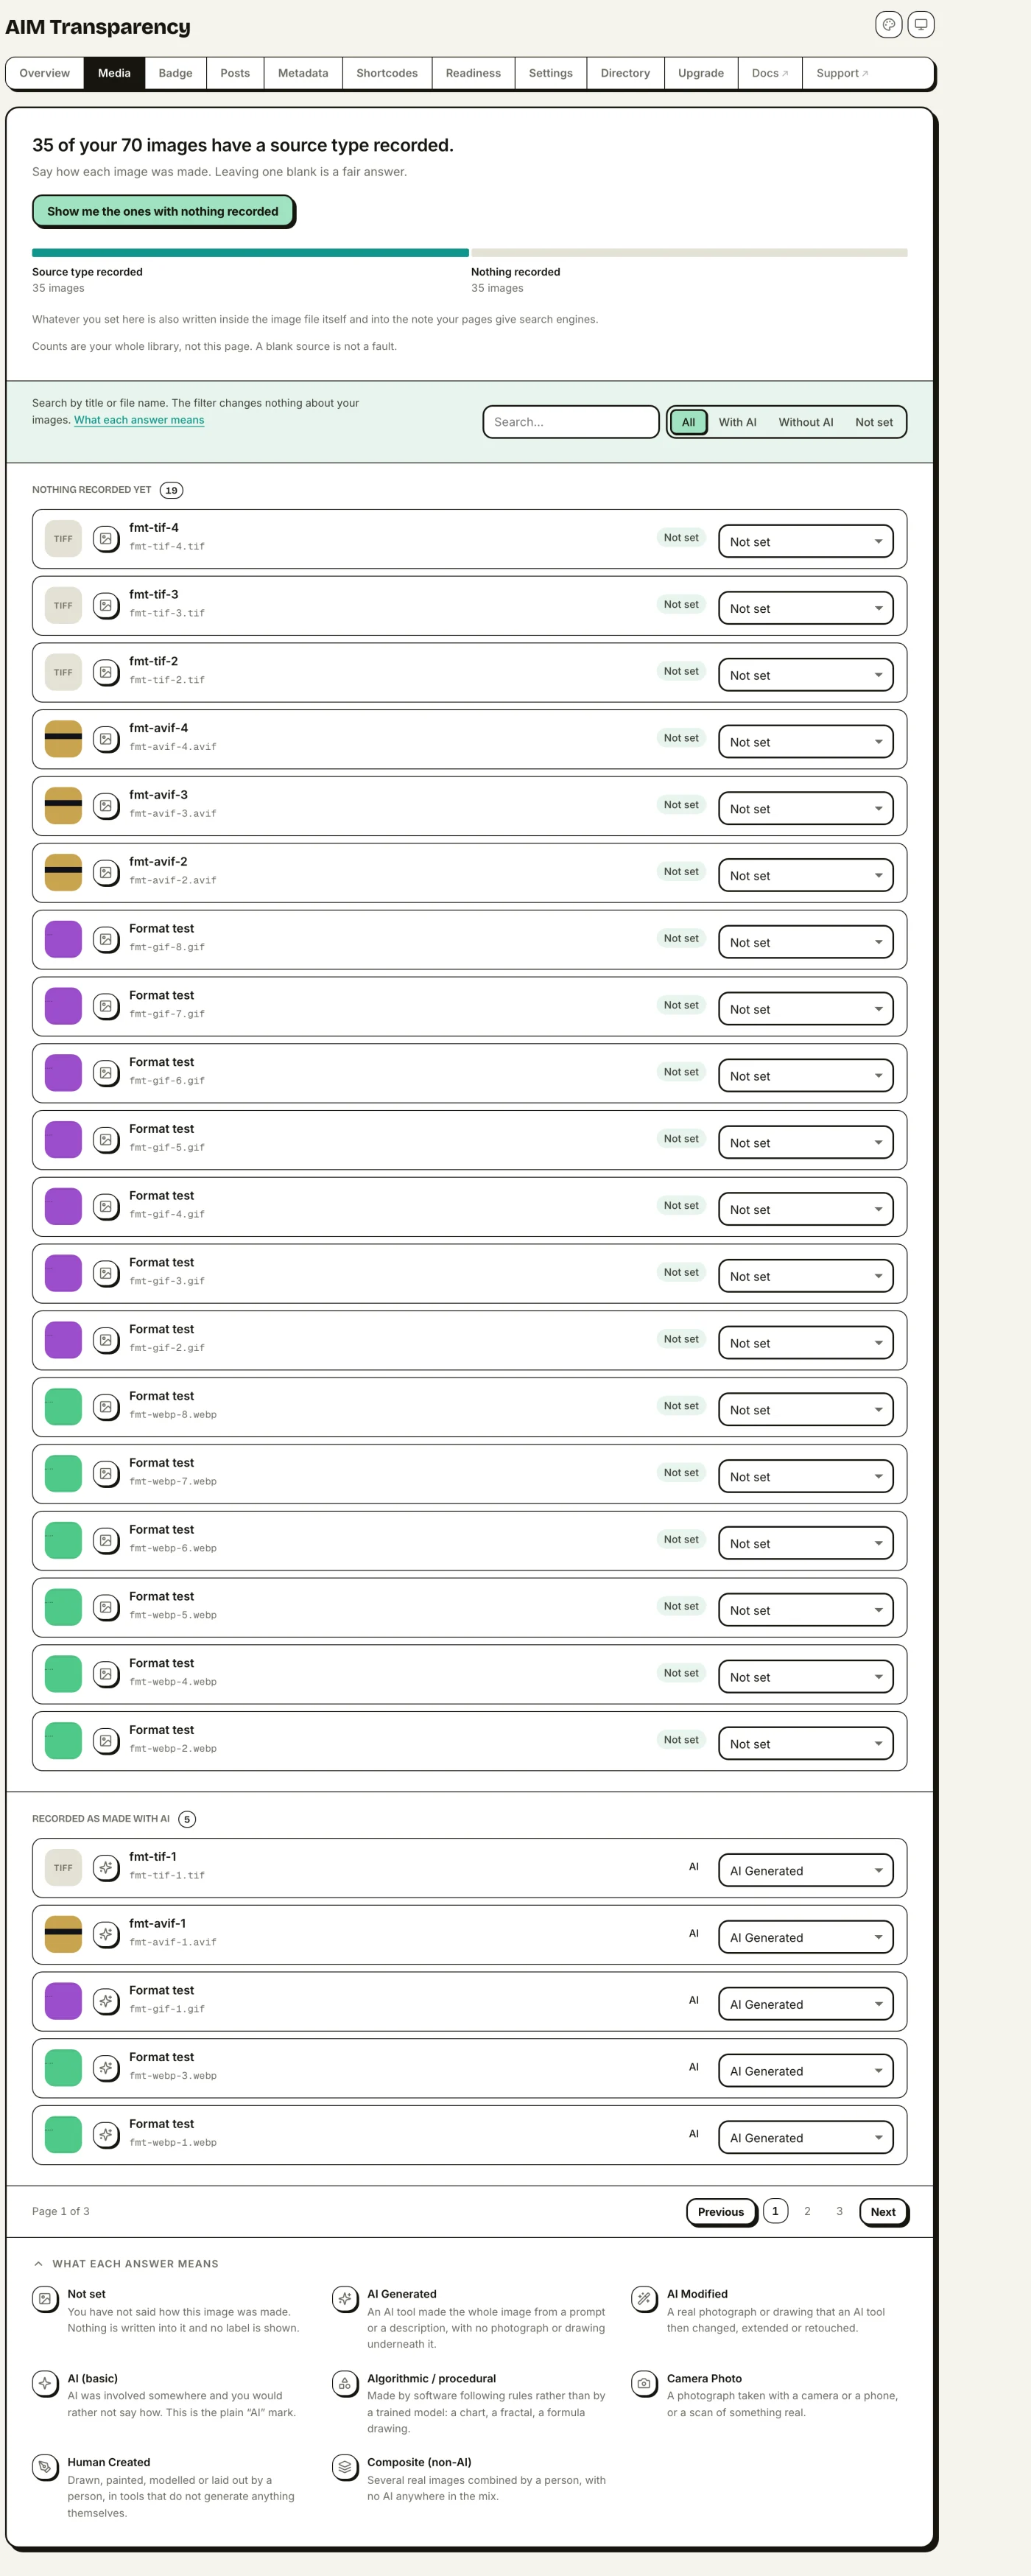
Flagging is how you tell the plugin how an image was made. You do it from the Media Library, and you can choose one of seven source types for each image, four for AI content and three for human provenance:
- AI Generated: fully created by generative AI (
trainedAlgorithmicMedia); shows the AI Generated label. - AI Modified: a real image edited by AI (
compositeWithTrainedAlgorithmicMedia); shows the AI Modified label. - AI (basic): AI was involved but you don’t need to say how; shows the compact AI mark and embeds the generic AI-generated value.
- Algorithmic / procedural: non-AI, computer-generated art such as fractals (
algorithmicMedia); recorded in metadata, but not badged as AI. - Camera Photo: captured from real life with a digital camera, no AI (
digitalCapture); metadata only, no badge by default. - Human Created: made by a human with non-generative digital tools, such as 3D renders or digital art (
digitalCreation); metadata only, no badge by default. - Composite: a mix of non-AI elements, e.g. photos + 3D renders (
composite); metadata only, no badge by default.
The human-provenance types are honest, machine-readable answers to “was this AI?” for work that wasn’t, useful for photographers, 3D artists and product teams whose files travel through PIM and ecommerce systems. An optional visible badge for these types is available with the Custom badge style.
From the Media Library
- One image at a time: open any image and pick its type from the AI source dropdown.
- Many at once: in list view, select the images you want and choose one of the Mark as… bulk actions.
- At a glance: the AI column shows each image’s current flag as a short code. Hover any code for its full name.
The codes, in the order they appear in the dropdown. A dash means the image has no source type recorded yet:
GenAI GeneratedModAI ModifiedAIAI (basic)AlgAlgorithmic / proceduralCamCamera PhotoHumHuman CreatedCmpComposite
From the dashboard
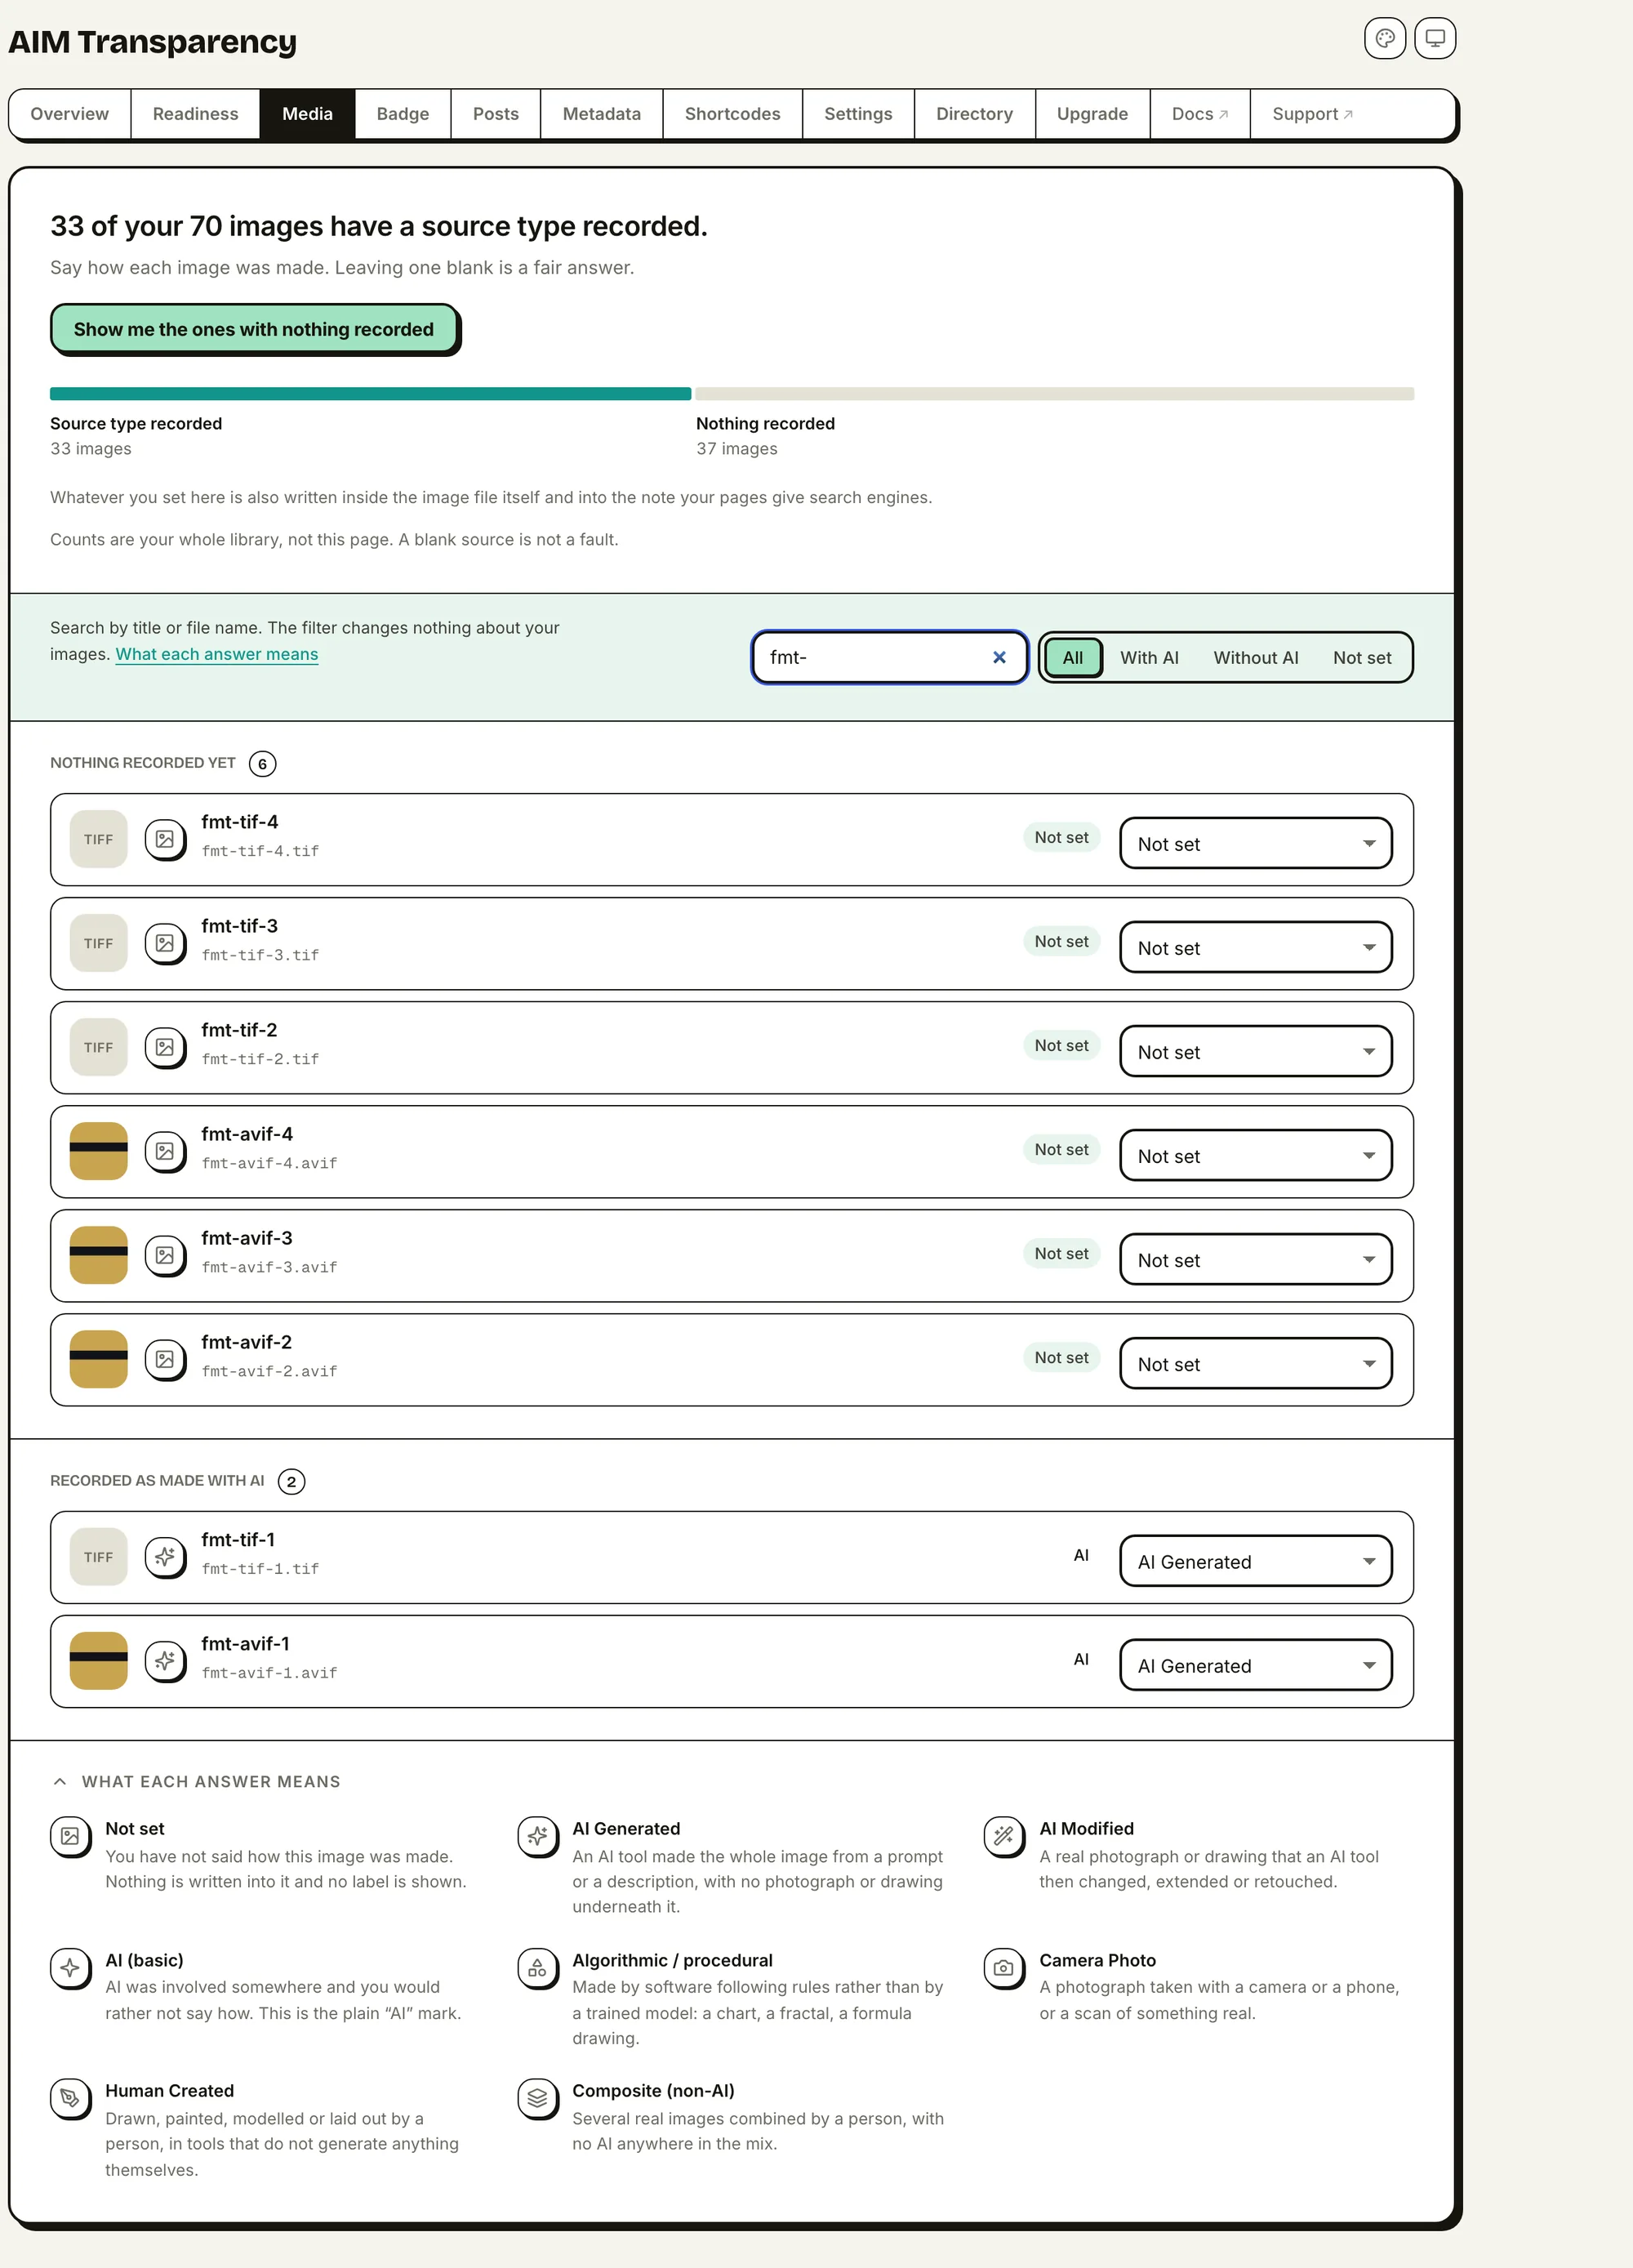
The Media tab lets you tag your whole library without leaving the dashboard. Search, filter by All / With AI / Without AI / Not set, and set each image’s type right there in the list.
Opening one image
Click a thumbnail and the image opens at full size with everything the plugin knows about it beside it: how it was made, where the disclosure actually lives, and the file’s own facts. It is the quickest way to check a single picture without leaving the list. Arrow keys step through the library, including across pages, and Esc returns you to the thumbnail you came from.
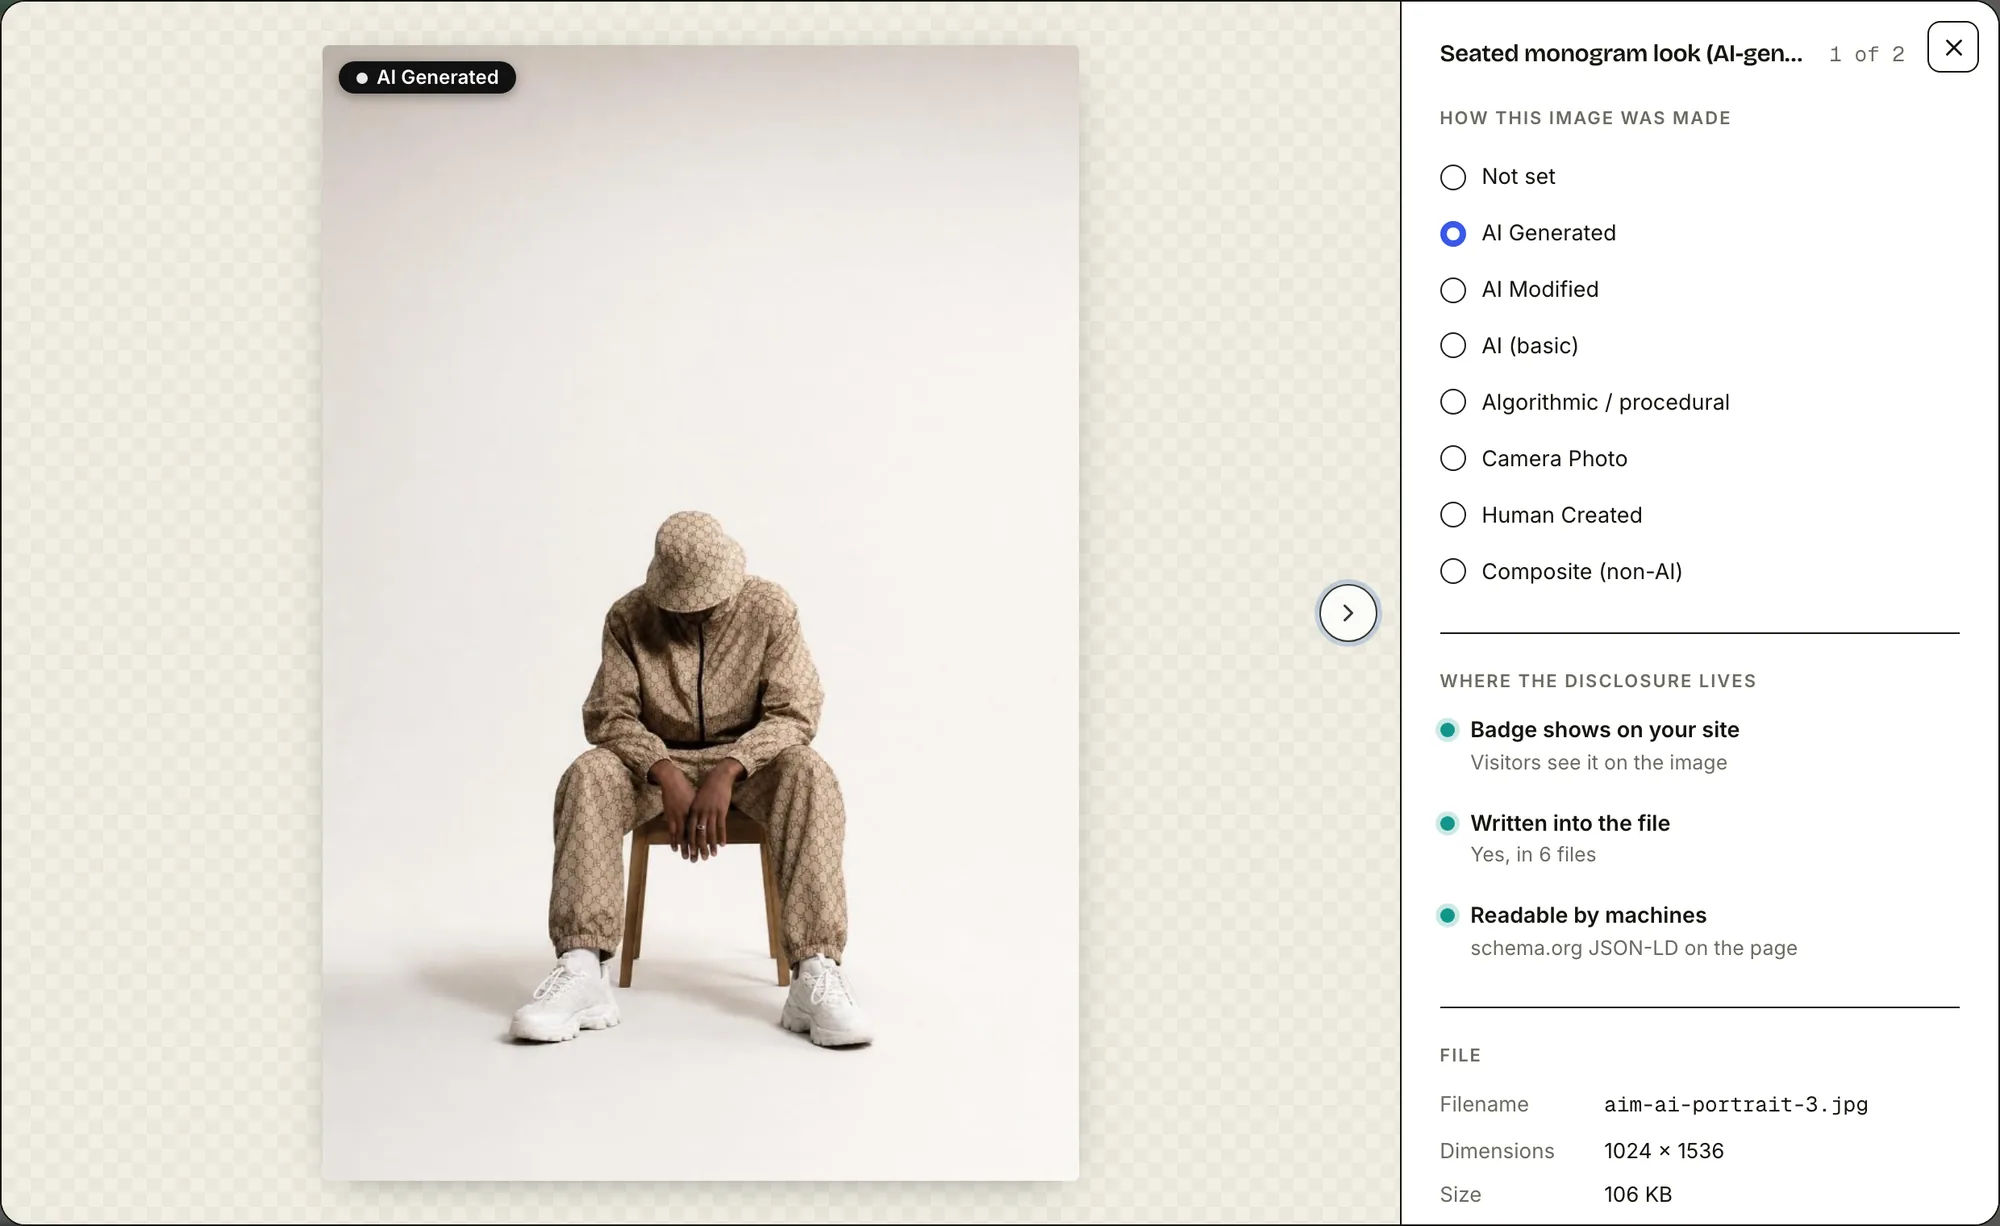
The three disclosure lines are read from your actual settings, not assumed. If a type carries no visible badge on your site — because the badge is switched off, that type is hidden, or the style you chose has no icon for it — the viewer says so rather than implying a label your visitors never see.
When an image will not display
Two states look like a broken plugin and are not, so the viewer names both.
A format no browser can show. WordPress accepts TIFF and HEIC uploads, and this plugin marks both of them on any host. No browser can actually draw one. Where your server can make JPEG copies you will never notice; where it cannot, the list shows the format instead of a torn-image icon, and the viewer says plainly that the file is on the server and its record is intact.
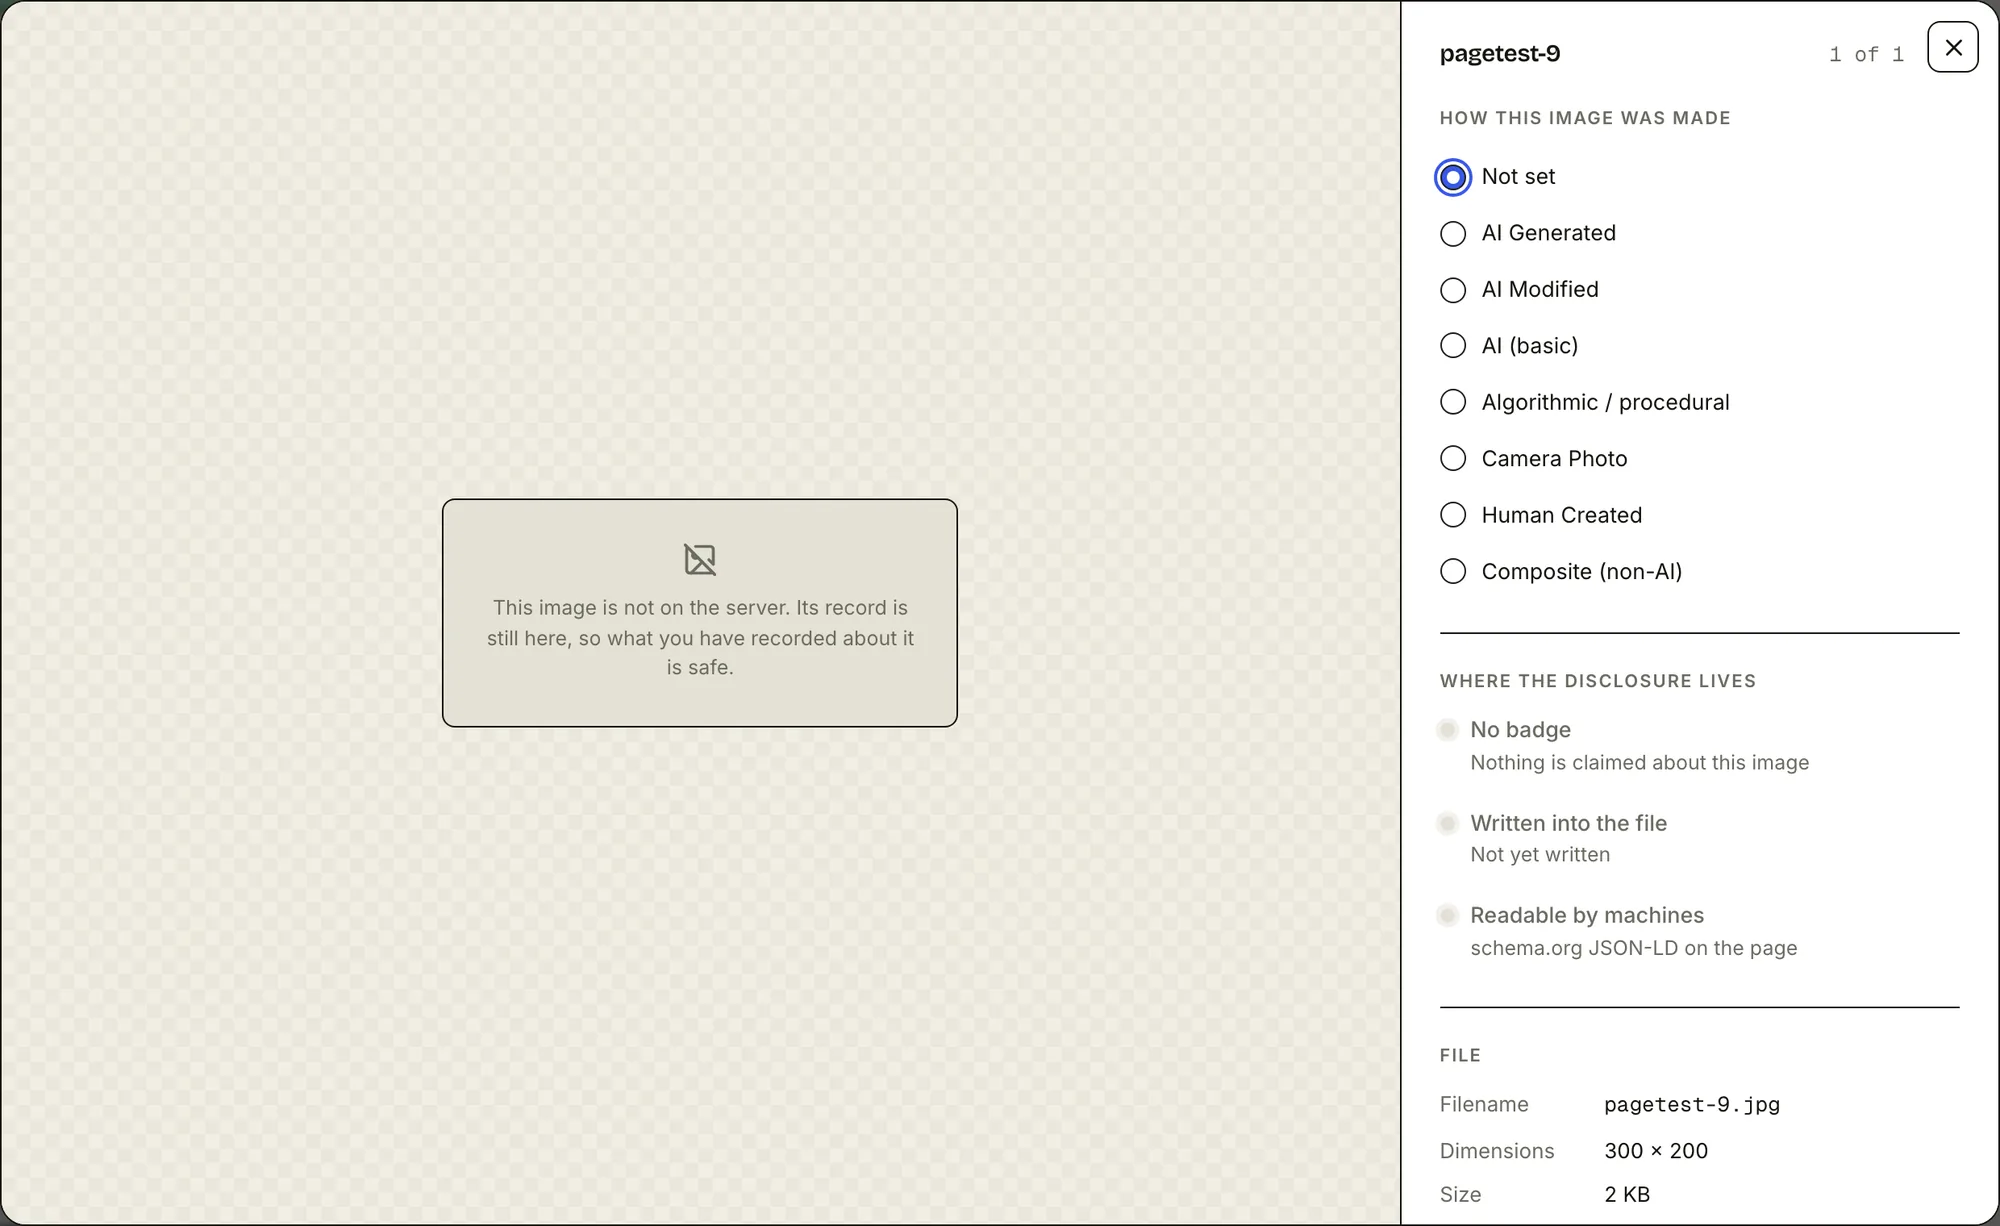
A file that has gone. An attachment can outlive its file after a half-finished migration or a tidy-up of the uploads folder. WordPress still lists it, so the viewer says what happened and reassures you that what you recorded about the image is kept.
From the post editor
A Featured image control (in both the classic and block editors) lets you flag a post’s featured image without leaving the editor.
Automatic flagging (Pro)
With AIM Transparency Pro, you don’t have to flag AI images by hand. When you upload an image, the plugin reads the provenance already stored inside the file and flags it for you: no guessing from pixels, no outside service, no false alarms. (Provenance is a record of where a file came from.)
How it works
When you upload an image, Pro looks inside the file for a C2PA or IPTC DigitalSourceType tag: the standard provenance field that tools like ChatGPT / DALL·E and Adobe Firefly write into their images. (C2PA, the Content Credentials standard, is the open format these tools use to record how a file was made.) If Pro finds the tag, it applies the right flag for you, and the badge, metadata and JSON-LD all follow. That includes the human-provenance values: a camera photo or a PIM-stamped master tagged digitalCapture, digitalCreation or composite upstream arrives already labelled, with its original bytes untouched. Images with no tag at all (untagged camera photos, or AI images that were screenshotted or had their metadata removed) are left alone, so you never get a false “AI” label.
It reads provenance. It does not detect AI from the picture. A proper
DigitalSourceTypetag is trusted and applied automatically. A plain generator name in the metadata is easy to fake, so Pro saves it as a suggestion for you to review; it never publishes that on its own.
The Overview shows automatic flagging as Active and lists what it found. You can turn it off under Settings > Automation.
Visible badge (Layer 1)
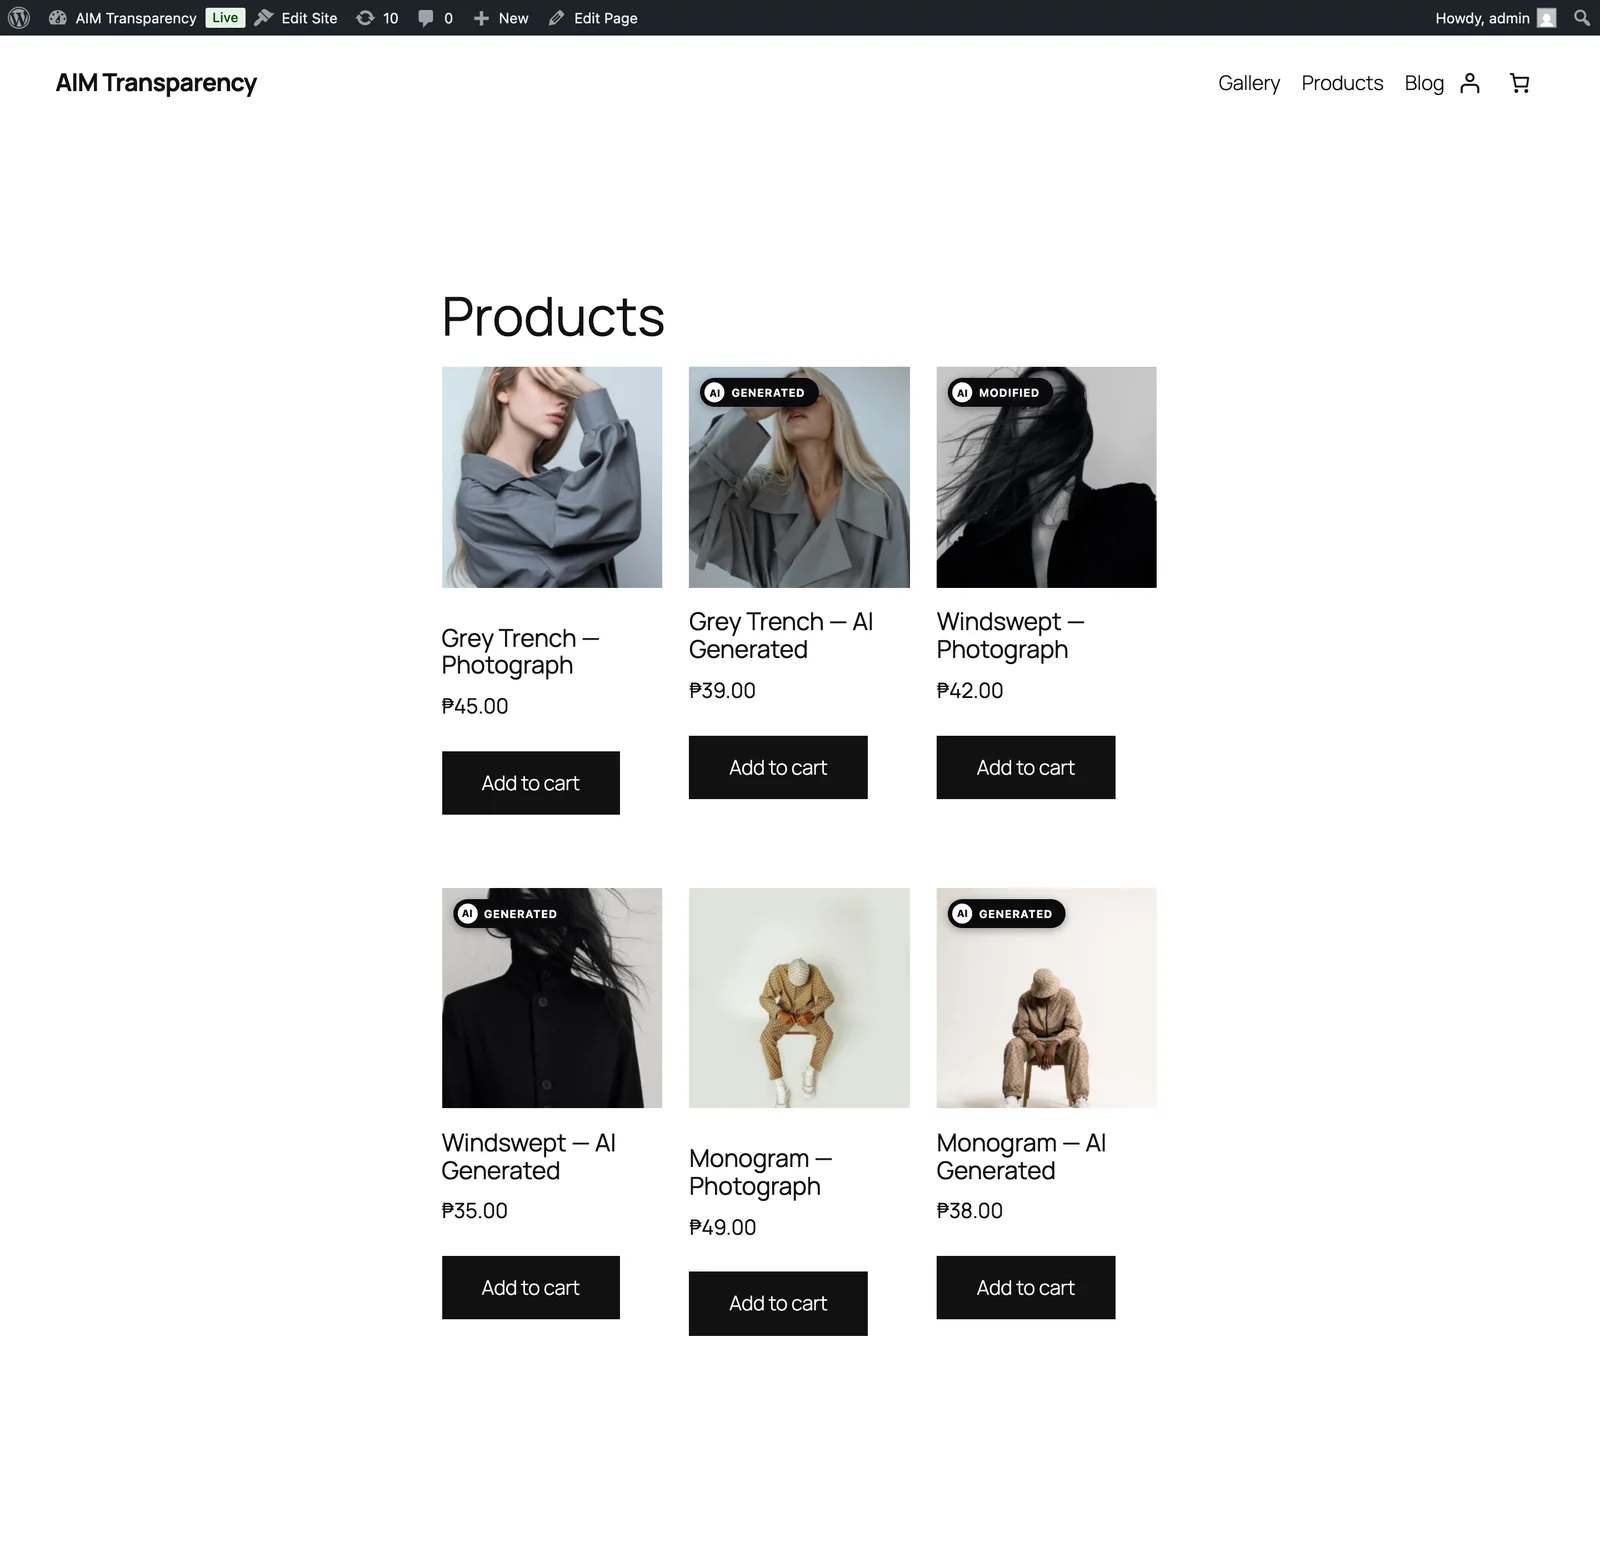
The badge is the clear, human-visible disclosure that a deployer needs to show under Article 50(4). By default, AIM Transparency shows a crisp, scalable badge drawn in the EU icon style (the built-in AIM badge), and picks the right label for each image’s source type automatically:


The badge appears next to the image on your live pages: across galleries, portfolio grids, masonry layouts, featured images and images in your content, and it works with block and full-site-editing (FSE) themes too. You can choose which corner it sits in, switch to the official EU Commission icons, or design a fully custom badge in Badge Studio (below).
The official EU icons are included as a one-click option: free to use, with no attribution required. Showing a badge is a big part of your Article 50 disclosure, but it doesn’t make you compliant on its own; see the disclaimer on the home page.
The three EU icons, and when to use each one
The European Commission publishes three icons, in black and white variants (the plugin bundles both), as SVG and PNG files. Here’s when each one applies:
| Icon | When to use | Example |
|---|---|---|
 | Basic: AI was involved in creating deep-fake content (image, audio, video) or published text, or when you pair it with your own text label / an interactive second layer. | A deep-fake video captioned “voices generated with”, followed by the basic icon. |
| Fully AI-Generated: the entire content is AI-generated, with no human-created elements or editorial control (beyond prompting). | Fully AI-generated videos of fictional events; AI-composed music or art; AI-generated news summaries. |
| Partially AI-Modified: pre-existing human-made content partially modified with AI (turning it into a deep fake, or text on matters of public interest). | A real photograph with an AI face-swap; an authentic empty room AI-furnished. |
User-tested: the Commission found that people recognised the icon far better when it was paired with a text label (like “modified”). That’s why AIM Transparency uses the full AI Generated / AI Modified labels by default, and keeps the compact basic mark as an option.
Using the EU icons is optional, but the Article 50 labelling obligation is not. The icons do not establish compliance by themselves. Deployers remain responsible for meeting Article 50. Source: European Commission: EU icons for labelling AI-generated content.
Badge Studio
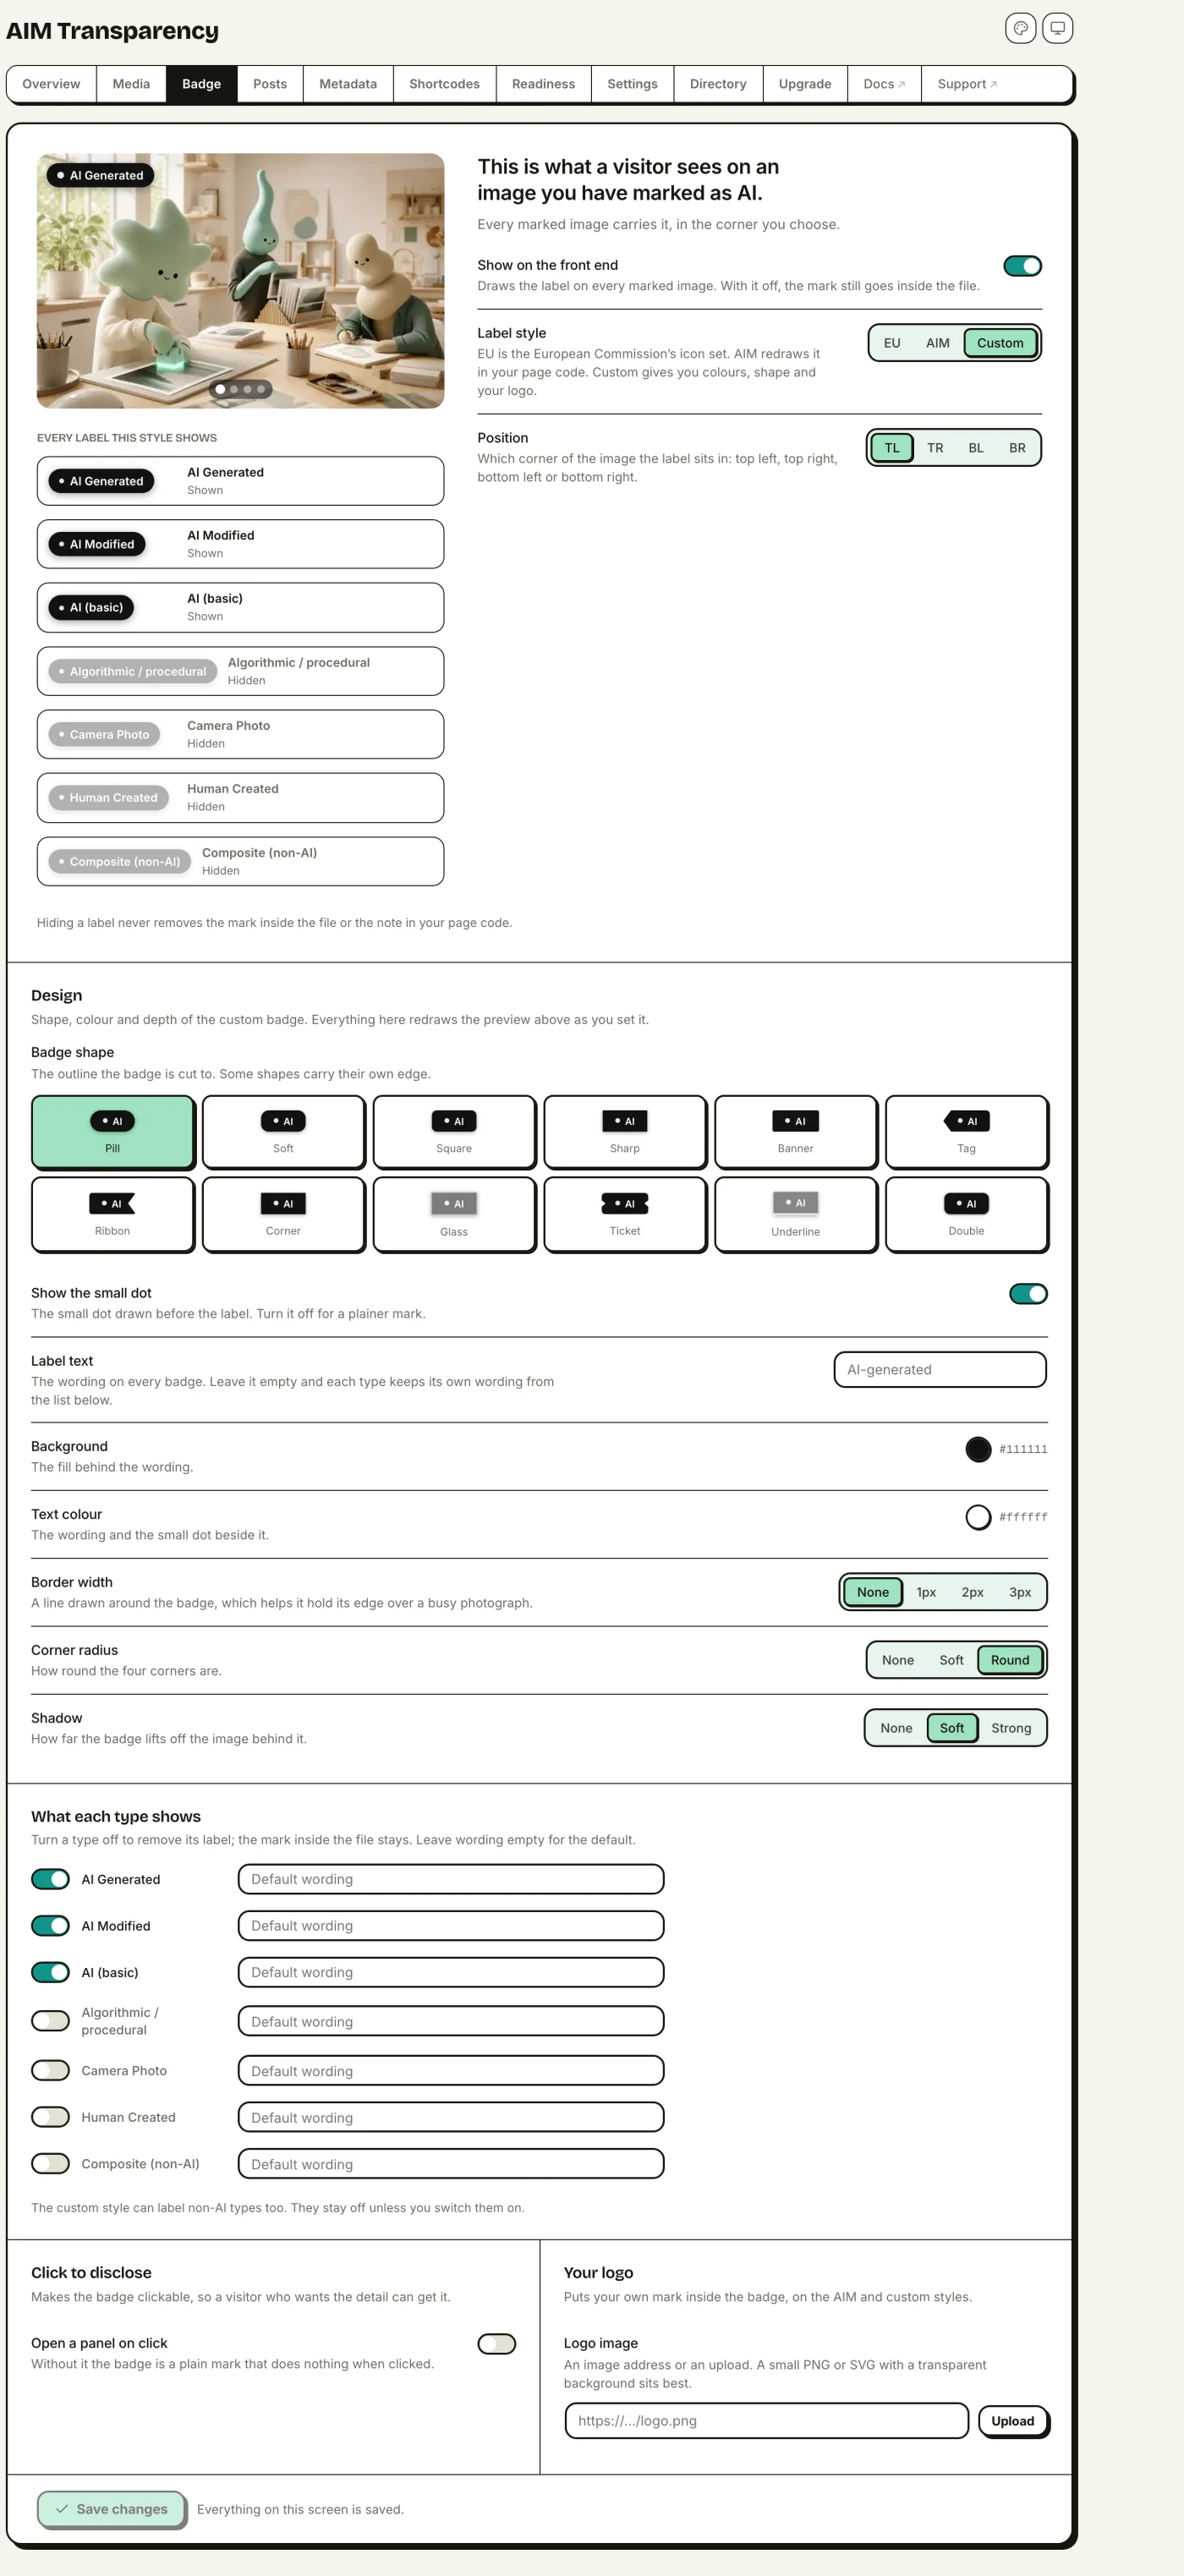
Set Label style to Custom to design your own badge, with a live preview as you go. The full studio is free:
- 12 shapes: pill, soft, square, sharp, banner, tag, ribbon, corner, outline, ticket, underline and double.
- Border, radius & shadow: tune the outline, corner rounding (None / Soft / Round) and depth, all with a real-time preview.
- Custom background & text colors.
- Per-type labels & visibility: rename the label for each source type, or hide the badge for a type while still writing its metadata into the file.
- Custom logo: upload your own logo to sit inside the badge (on the AIM and Custom styles; the official EU icon is never altered).
- The small dot: the custom badge draws a dot before its label. From 2.1.6 you can switch it off for a plainer mark, and setting a logo hides it for you, so the badge carries one mark rather than two.
Click-to-disclose modal
Turn the badge into a clickable disclosure. A visitor clicks it to open a small pop-up (an accessible modal) that explains the image is AI content. You can edit the title and body, and the body accepts basic HTML (links, bold and lists), so you can link straight to your AI policy. Leave it blank and the plugin fills in sensible text for each source type.
Embedded metadata (Layer 2)
When you flag an image, AIM Transparency writes the IPTC “Digital Source Type” tag inside the file: the property Iptc4xmpExt:DigitalSourceType, set to the standard IPTC vocabulary link. (It lives in the file’s XMP block, the part of an image that holds this kind of metadata.) The tag is written into the original image and every resized copy WordPress makes, so it stays with the file when it’s resized, downloaded or shared. This is the same value search engines read to label AI images.
This is what gets embedded for an AI-generated image:
<!-- inside the file's XMP packet -->
<rdf:Description rdf:about=""
  xmlns:Iptc4xmpExt="http://iptc.org/std/Iptc4xmpExt/2008-02-29/">
  <Iptc4xmpExt:DigitalSourceType>
    http://cv.iptc.org/newscodes/digitalsourcetype/trainedAlgorithmicMedia
  </Iptc4xmpExt:DigitalSourceType>
</rdf:Description>
How it’s written
- A built-in pure-PHP writer handles every format: JPEG, PNG, WebP, GIF, TIFF, and AVIF/HEIC/HEIF. No server tools needed.
- Since 2.2.1 exiftool is not used at all, even where a host has it. Only the built-in writer performs the safety checks that leave a multi-picture iPhone photo or an awkward HEIC layout alone, and handing the write to exiftool skipped every one of them. Developers can opt back in with the
aicl_use_exiftoolfilter. - Changes stay inside your uploads folder, and re-running is safe: it won’t duplicate anything or add the tag twice.
If you crop or rotate the image later
The disclosure follows the edit. This is worth stating because it is not automatic in WordPress: re-encoding an image discards its XMP block, so a crop would otherwise quietly leave you with a picture that has lost its mark.
WordPress has two image editors and they behave differently, so both are handled. Editing from inside a post saves the result as a new image, and the source type is copied onto it before the tag is written. Editing from the Media screen rewrites the existing files in place, and the tag is written again afterwards, with the recorded status updated to match. If a rotate changes the dimensions enough that WordPress makes one fewer size, the count on the Media screen goes down by one, which is the file count changing rather than anything being missed.
Editing an image you have not flagged changes nothing and adds no tag.
The Metadata screen shows every format the mark is written into on your server, how many of your files carry it, and whether it is still there by the time a visitor loads the image.
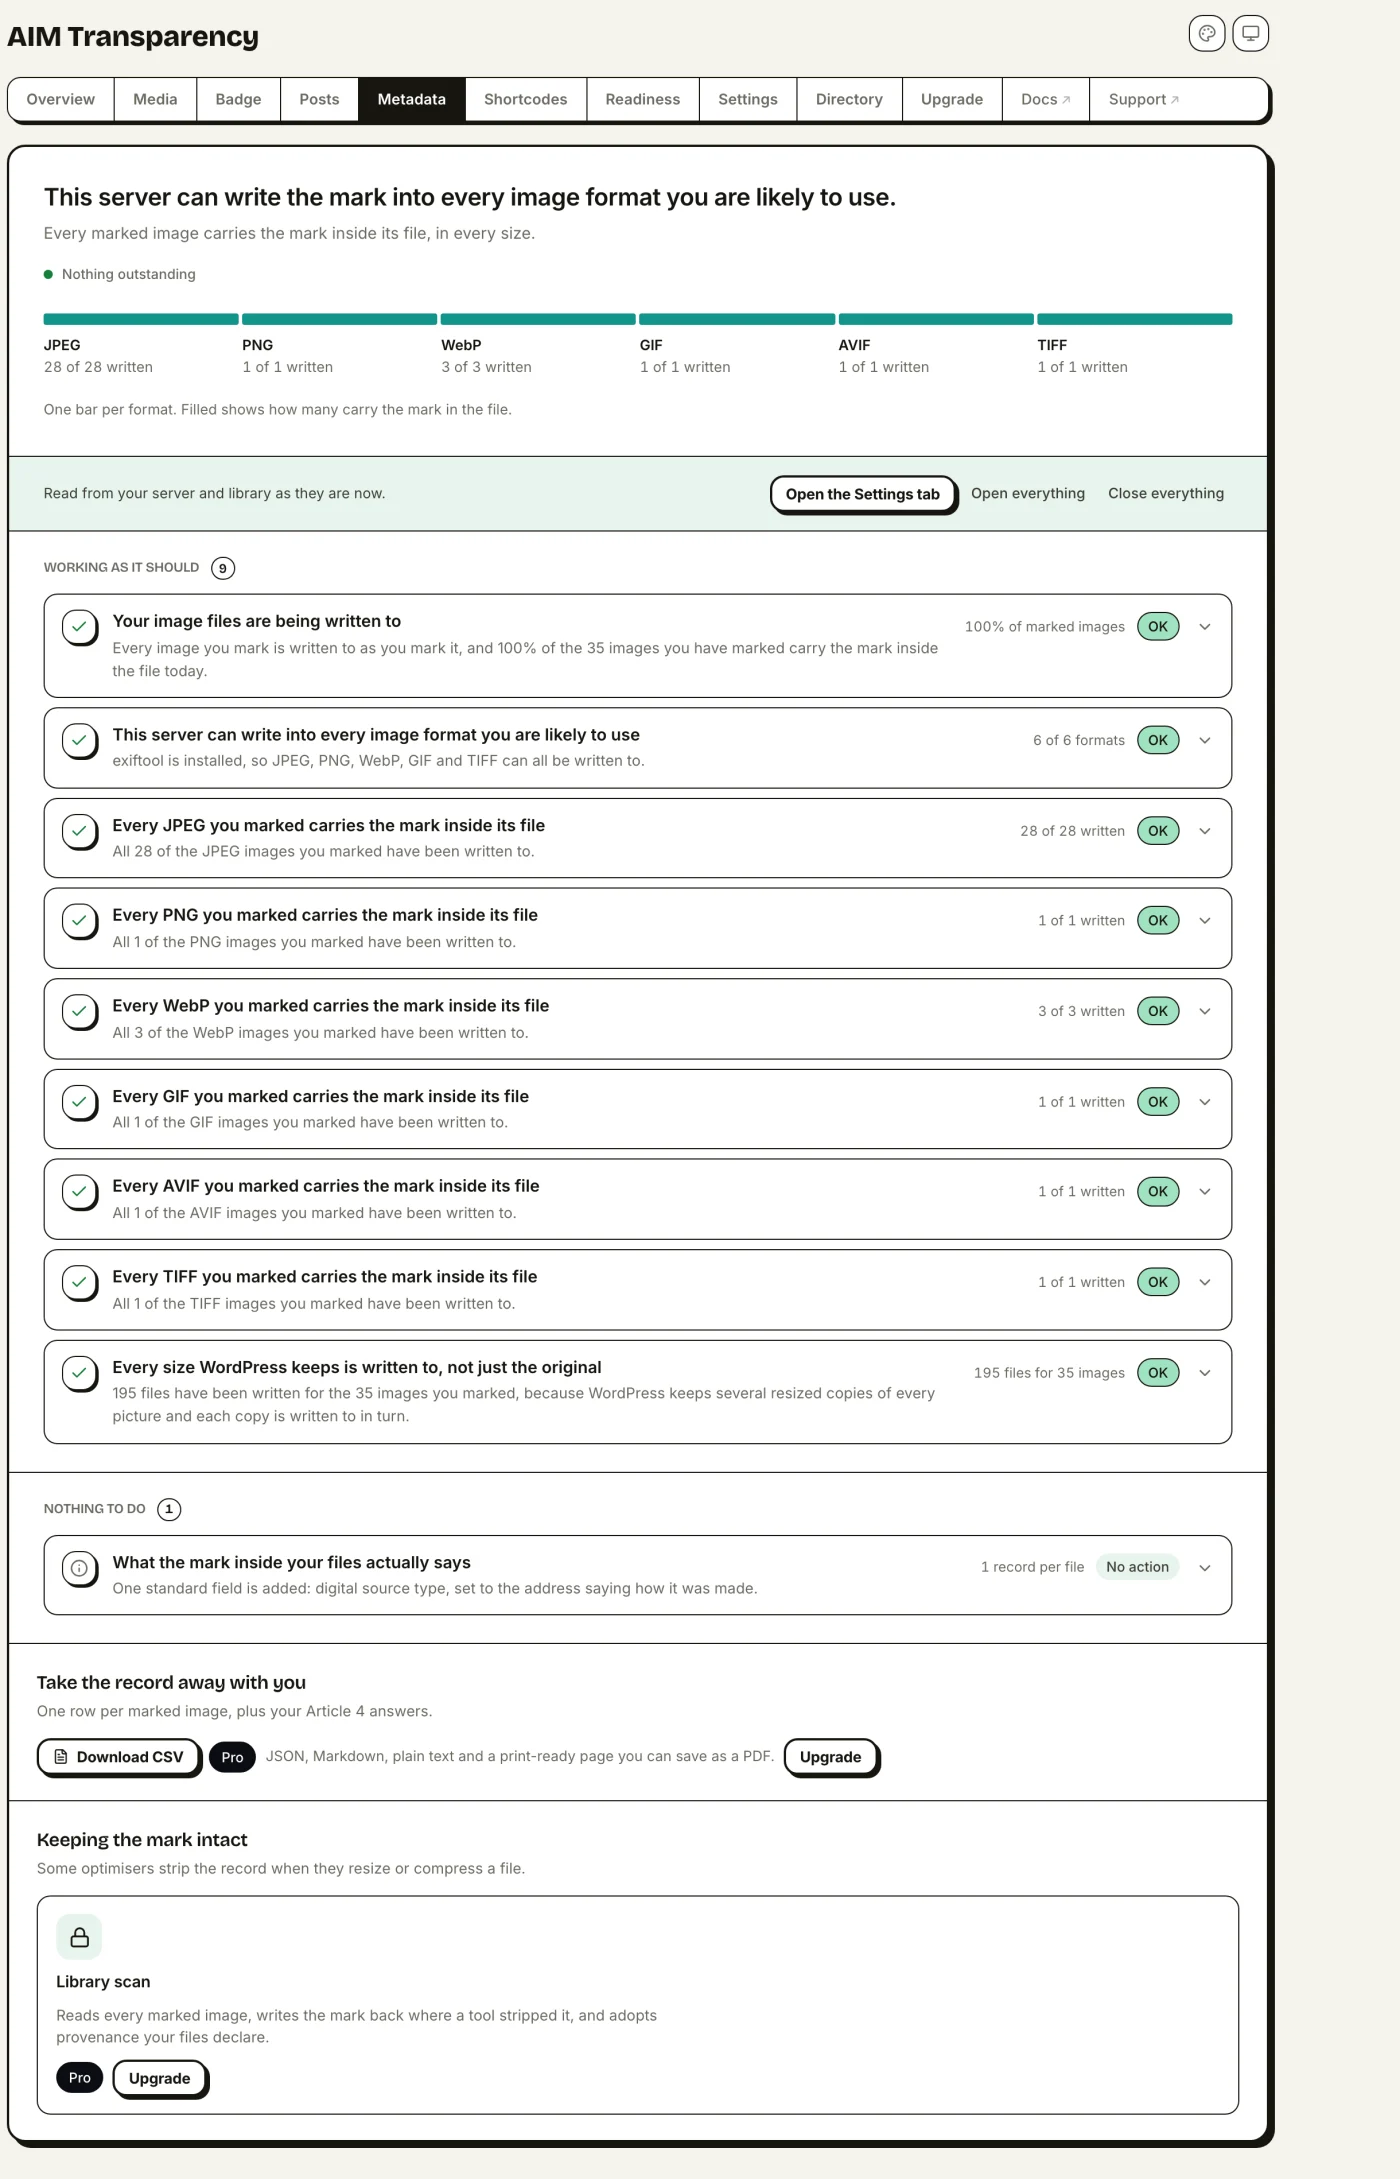
Prefer not to change your image files at all? Turn embedding off in Settings and use just the visible badge and the JSON-LD.
Does the mark reach your visitors?
Written into the file is not the same as delivered. Some CDN features and image optimisers re-encode a picture on its way out, which strips the embedded mark without touching anything on your server. From the server the file still looks marked, so a report built only from what is on disk says everything is fine when it is not.
Once a day the plugin fetches one of your own images over its public address, the way a visitor would, and reads the bytes that actually arrive. The Metadata screen reports one of three things:
- Arriving intact. The mark was still in the image that came back.
- Being stripped in delivery. The file on your server carries the mark and the copy your readers receive does not. Where the response identifies what did it, such as Cloudflare Polish, Jetpack Photon or BunnyCDN, the screen names it. Turning off image re-compression for your site is the usual fix.
- Could not be checked. Your site could not fetch its own image. A site behind a password, or one not publicly reachable, always reads like this. It is not evidence either way, and it is never reported as stripping.
The check reads the delivered bytes rather than looking for known vendors, so it catches any re-encoder, including ones nobody has catalogued. Response headers are read afterwards only to name a likely culprit; the finding never depends on recognising one.
schema.org JSON-LD (Layer 3)
On any page that shows a flagged image, AIM Transparency adds a schema.org ImageObject inside a <script type="application/ld+json"> tag in the page footer. It includes the same IPTC source-type value in a machine-readable form, so search engines and provenance tools can read it without opening the image file:
<script type="application/ld+json">
{
  "@context": "https://schema.org",
  "@graph": [
    {
      "@type": "ImageObject",
      "contentUrl": "https://example.com/.../sunrise.jpg",
      "creditText": "AI Generated",
      "additionalProperty": {
        "@type": "PropertyValue",
        "propertyID": "IPTC:DigitalSourceType",
        "value": "http://cv.iptc.org/newscodes/digitalsourcetype/trainedAlgorithmicMedia"
      }
    }
  ]
}
</script>
The plugin adds one ImageObject for each flagged image on the page. You can turn it off in Settings if you only want the badge and the embedded metadata.
Chatbot disclosure (free)
The EU AI Act's Article 50(1) asks you to tell visitors when they're interacting with an AI system, not a human. If your site runs a chatbot or AI assistant, AIM Transparency can show a small disclosure notice: free, and independent of the image features.
The reliable way: a shortcode
Place the [aicl_ai_notice] shortcode on any page whose chat UI you build yourself. It renders a clear notice server-side, so it is guaranteed to appear. Override the wording per placement with [aicl_ai_notice text="You're chatting with our AI assistant"].
This is the chatbot case of a general tool. To disclose AI in written content, see Disclosure shortcodes below.
Automatic detection
Turn on Chatbot disclosure in Settings and the plugin shows a small fixed disclosure pill on any page where it detects a known chat widget: Tidio, Crisp, Intercom, Drift, HubSpot, Tawk, LiveChat, Dialogflow, Zoho SalesIQ and more. You can set:
- Notice text: the disclosure wording (fully translatable).
- Position: which corner the pill sits in.
- Extra selectors: CSS selectors for a widget we don't recognise.
Auto-detection is best-effort: a third-party chat widget renders inside its own cross-origin iframe, which no plugin can reach into, so the disclosure sits beside the widget rather than inside it. For a chat UI you control, the
[aicl_ai_notice]shortcode is the guaranteed route.
AI-written text (free)
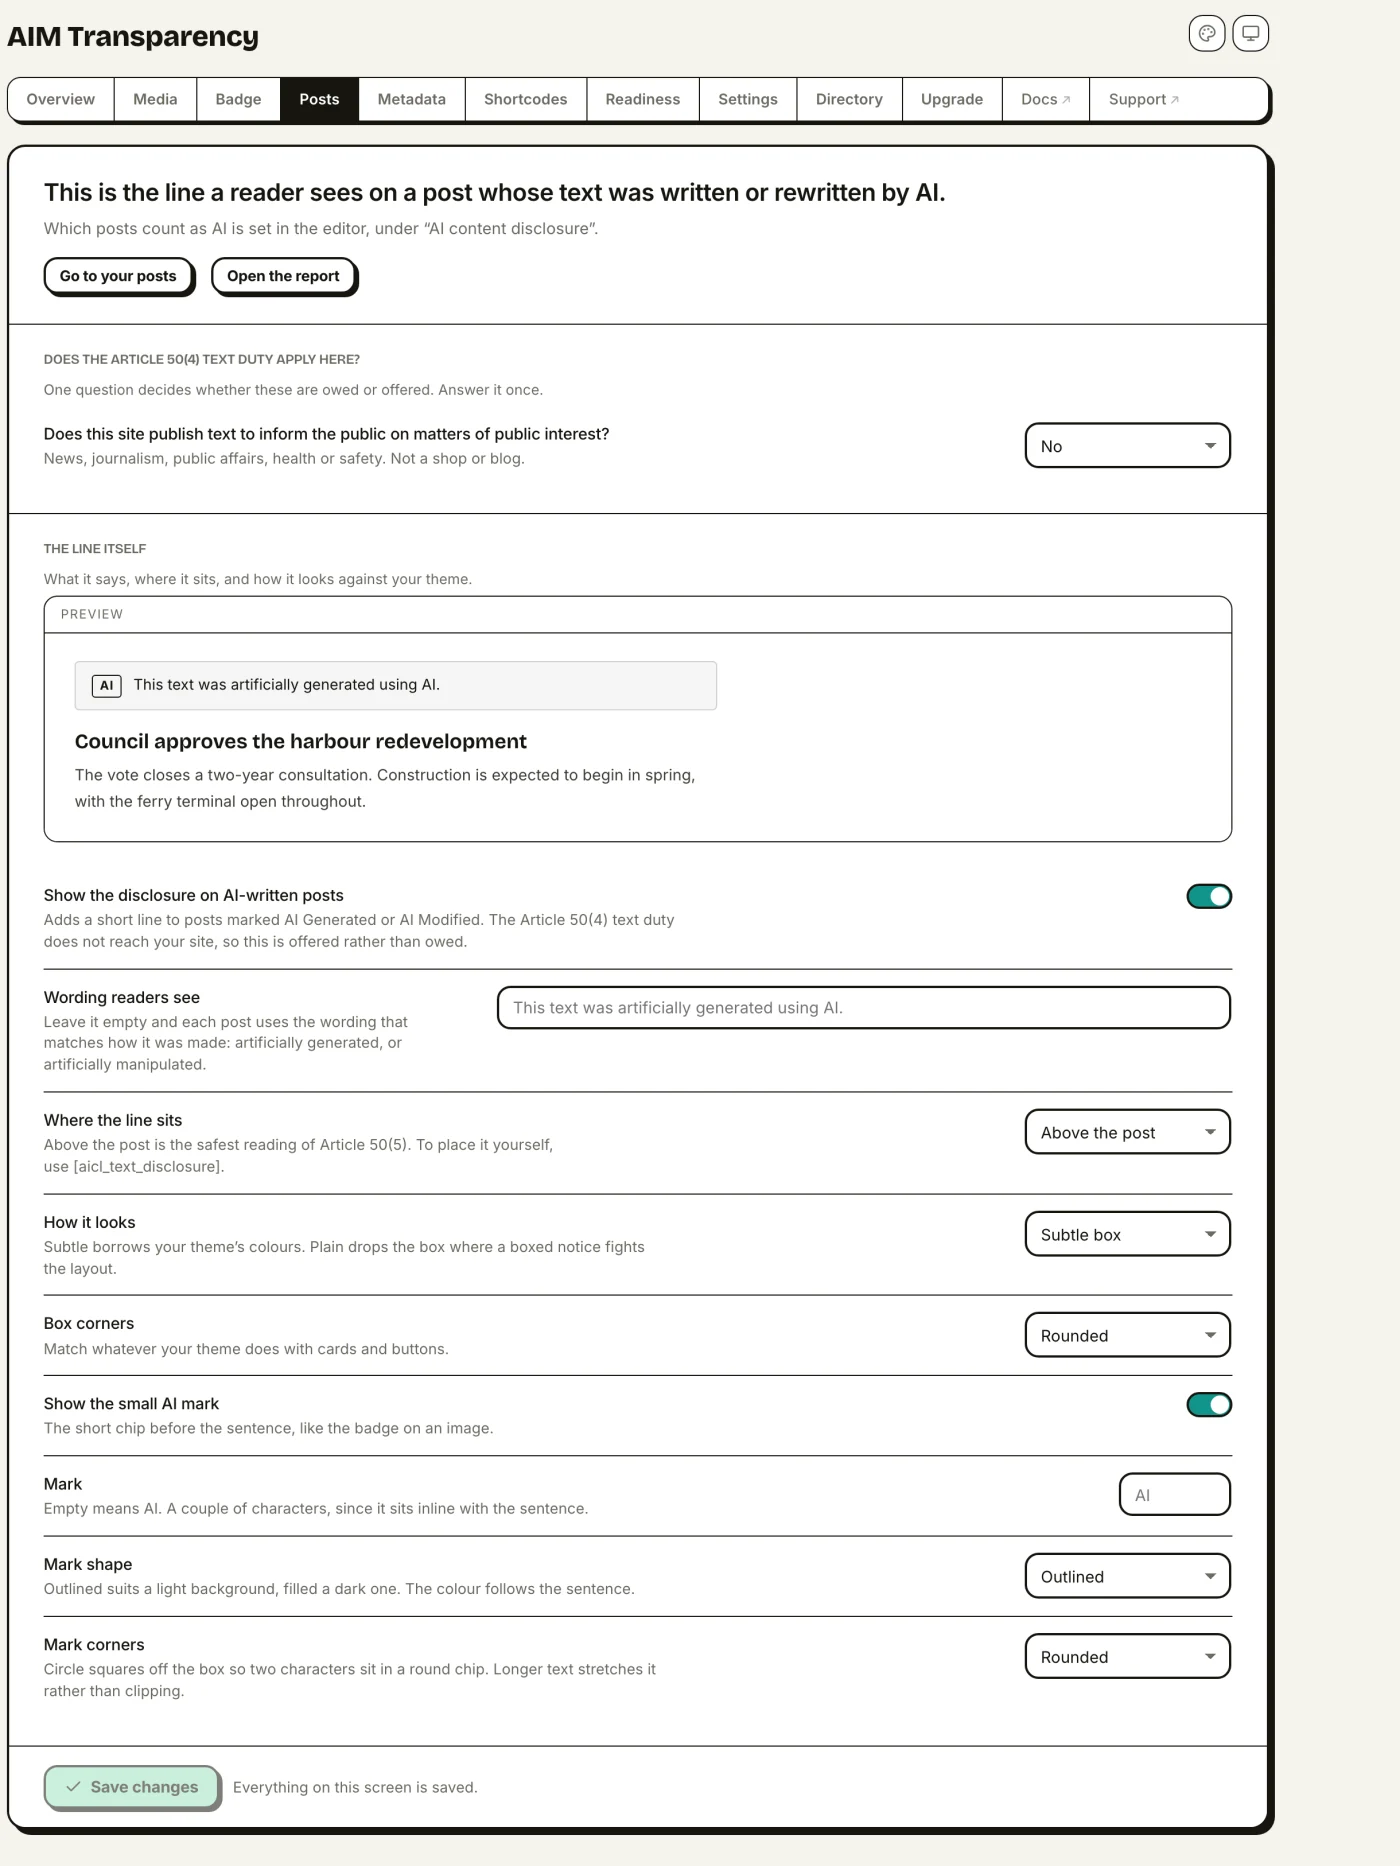
Article 50(4) has two halves. The first covers images, audio and video, which is what the badge is for. The second covers text, and only text published to inform the public on matters of public interest: news, journalism, public affairs, health or safety guidance. A shop, a portfolio or a personal blog is not that, and the duty never reaches it at all.
One question decides whether it applies to you
Because the scope is narrow, the plugin asks once rather than nagging. On the Posts tab: “Does this site publish text to inform the public on matters of public interest?” Answer no and nothing below it is a compliance duty, and your readiness score stops counting text for or against you. Answer yes and the disclosure becomes something you owe rather than something you offer.
You can still disclose after answering no. It is simply your choice at that point, and the dashboard says so instead of showing you a gap you do not have.
Recording how a post was written
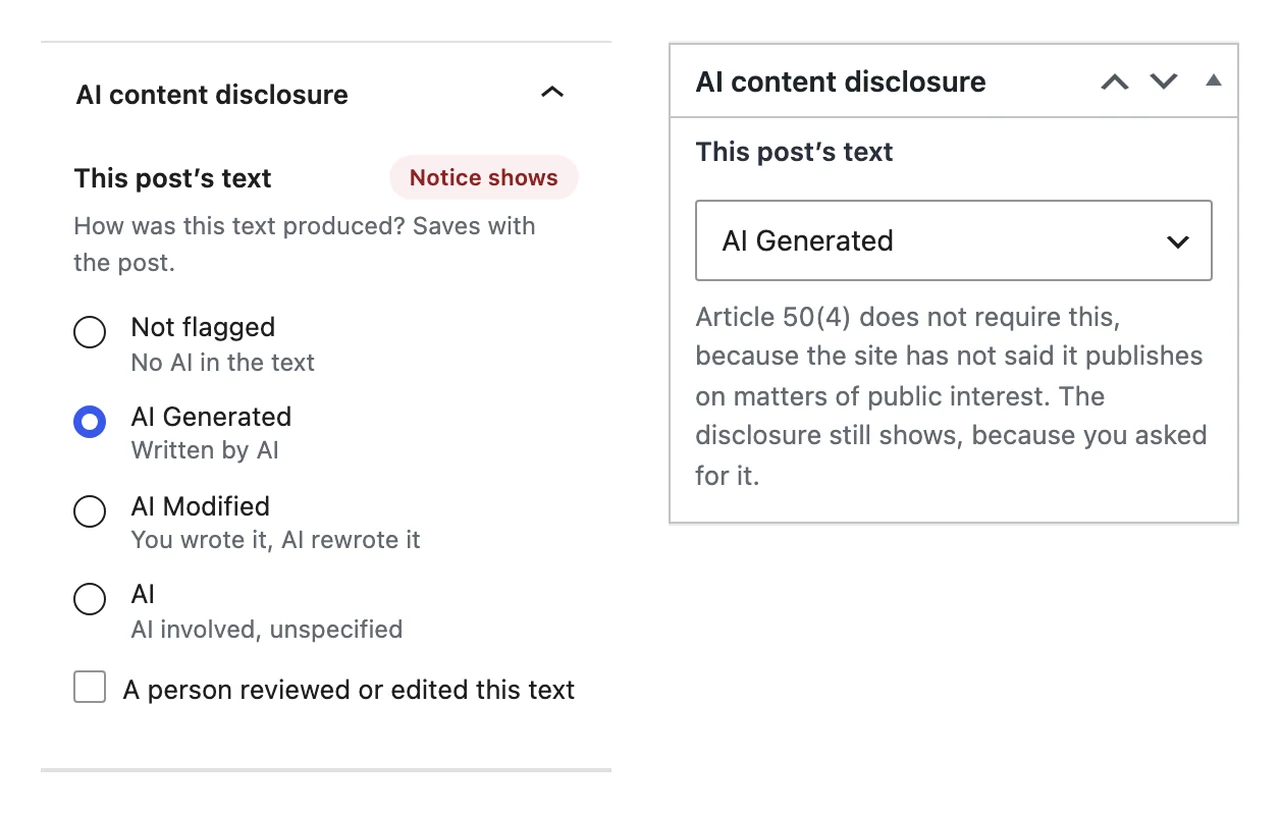
Each post gets an AI content disclosure panel in the editor — the block editor and the classic editor both — with four answers: written by AI, you wrote it and AI rewrote it, AI involved without saying how, or no AI in the text. The first two map to the Regulation’s own two verbs, artificially generated and artificially manipulated, which are different claims and are not interchangeable.
A disclosed post carries a short line for readers, and schema.org JSON-LD describing the article for machines, alongside the existing ImageObject data for any pictures.
The exemption is worked out, not claimed
Article 50(4) exempts text that has had human review or editorial control and where a natural or legal person holds editorial responsibility. Those are two conditions, not one. The plugin collects both, with the review date, and only then treats a post as exempt.
Tick the review box but name nobody and you have met half the test, so the post still discloses and the dashboard tells you which half is missing. That is deliberate: a checkbox on its own is not the exemption the Regulation describes.
Placing the line yourself
By default the line sits above the post, which is the safest reading of Article 50(5): people should be told at the point they first meet the content. To put it somewhere else, such as under a byline, use [aicl_text_disclosure]. Using the shortcode switches off the automatic copy for that post, so the two do not both appear, as long as the shortcode runs before the post content is filtered. That covers putting it in the content, or anywhere above it in a template. It prints nothing on a post you have not marked, or on one the exemption covers.
Step by step, with the scope test and the exemption in full: how to disclose AI-written text in WordPress.
Text and images are judged separately, because the law judges them separately. Human review of an article does not exempt an AI-generated image inside it: the badge stays, and answering “no” to the public-interest question never removes it.
Disclosure shortcodes (free)
Images get a badge because there is a file to attach it to. Written content has no file, so it gets a shortcode instead. [aicl_disclosure] places an AI notice anywhere shortcodes run: a post, a page, a widget or a block.
[aicl_disclosure] is the same mechanism for any AI content, not just chatbots. It is how you disclose AI in writing, where there is no image for a badge to attach to.
| Attribute | Values | Default |
|---|---|---|
type | ai-generated, ai-edited, ai-assisted, chatbot | ai-generated |
style | inline (flows in a sentence), badge (its own line), banner (full-width block) | inline |
text | Any sentence, replacing the type's default wording | — |
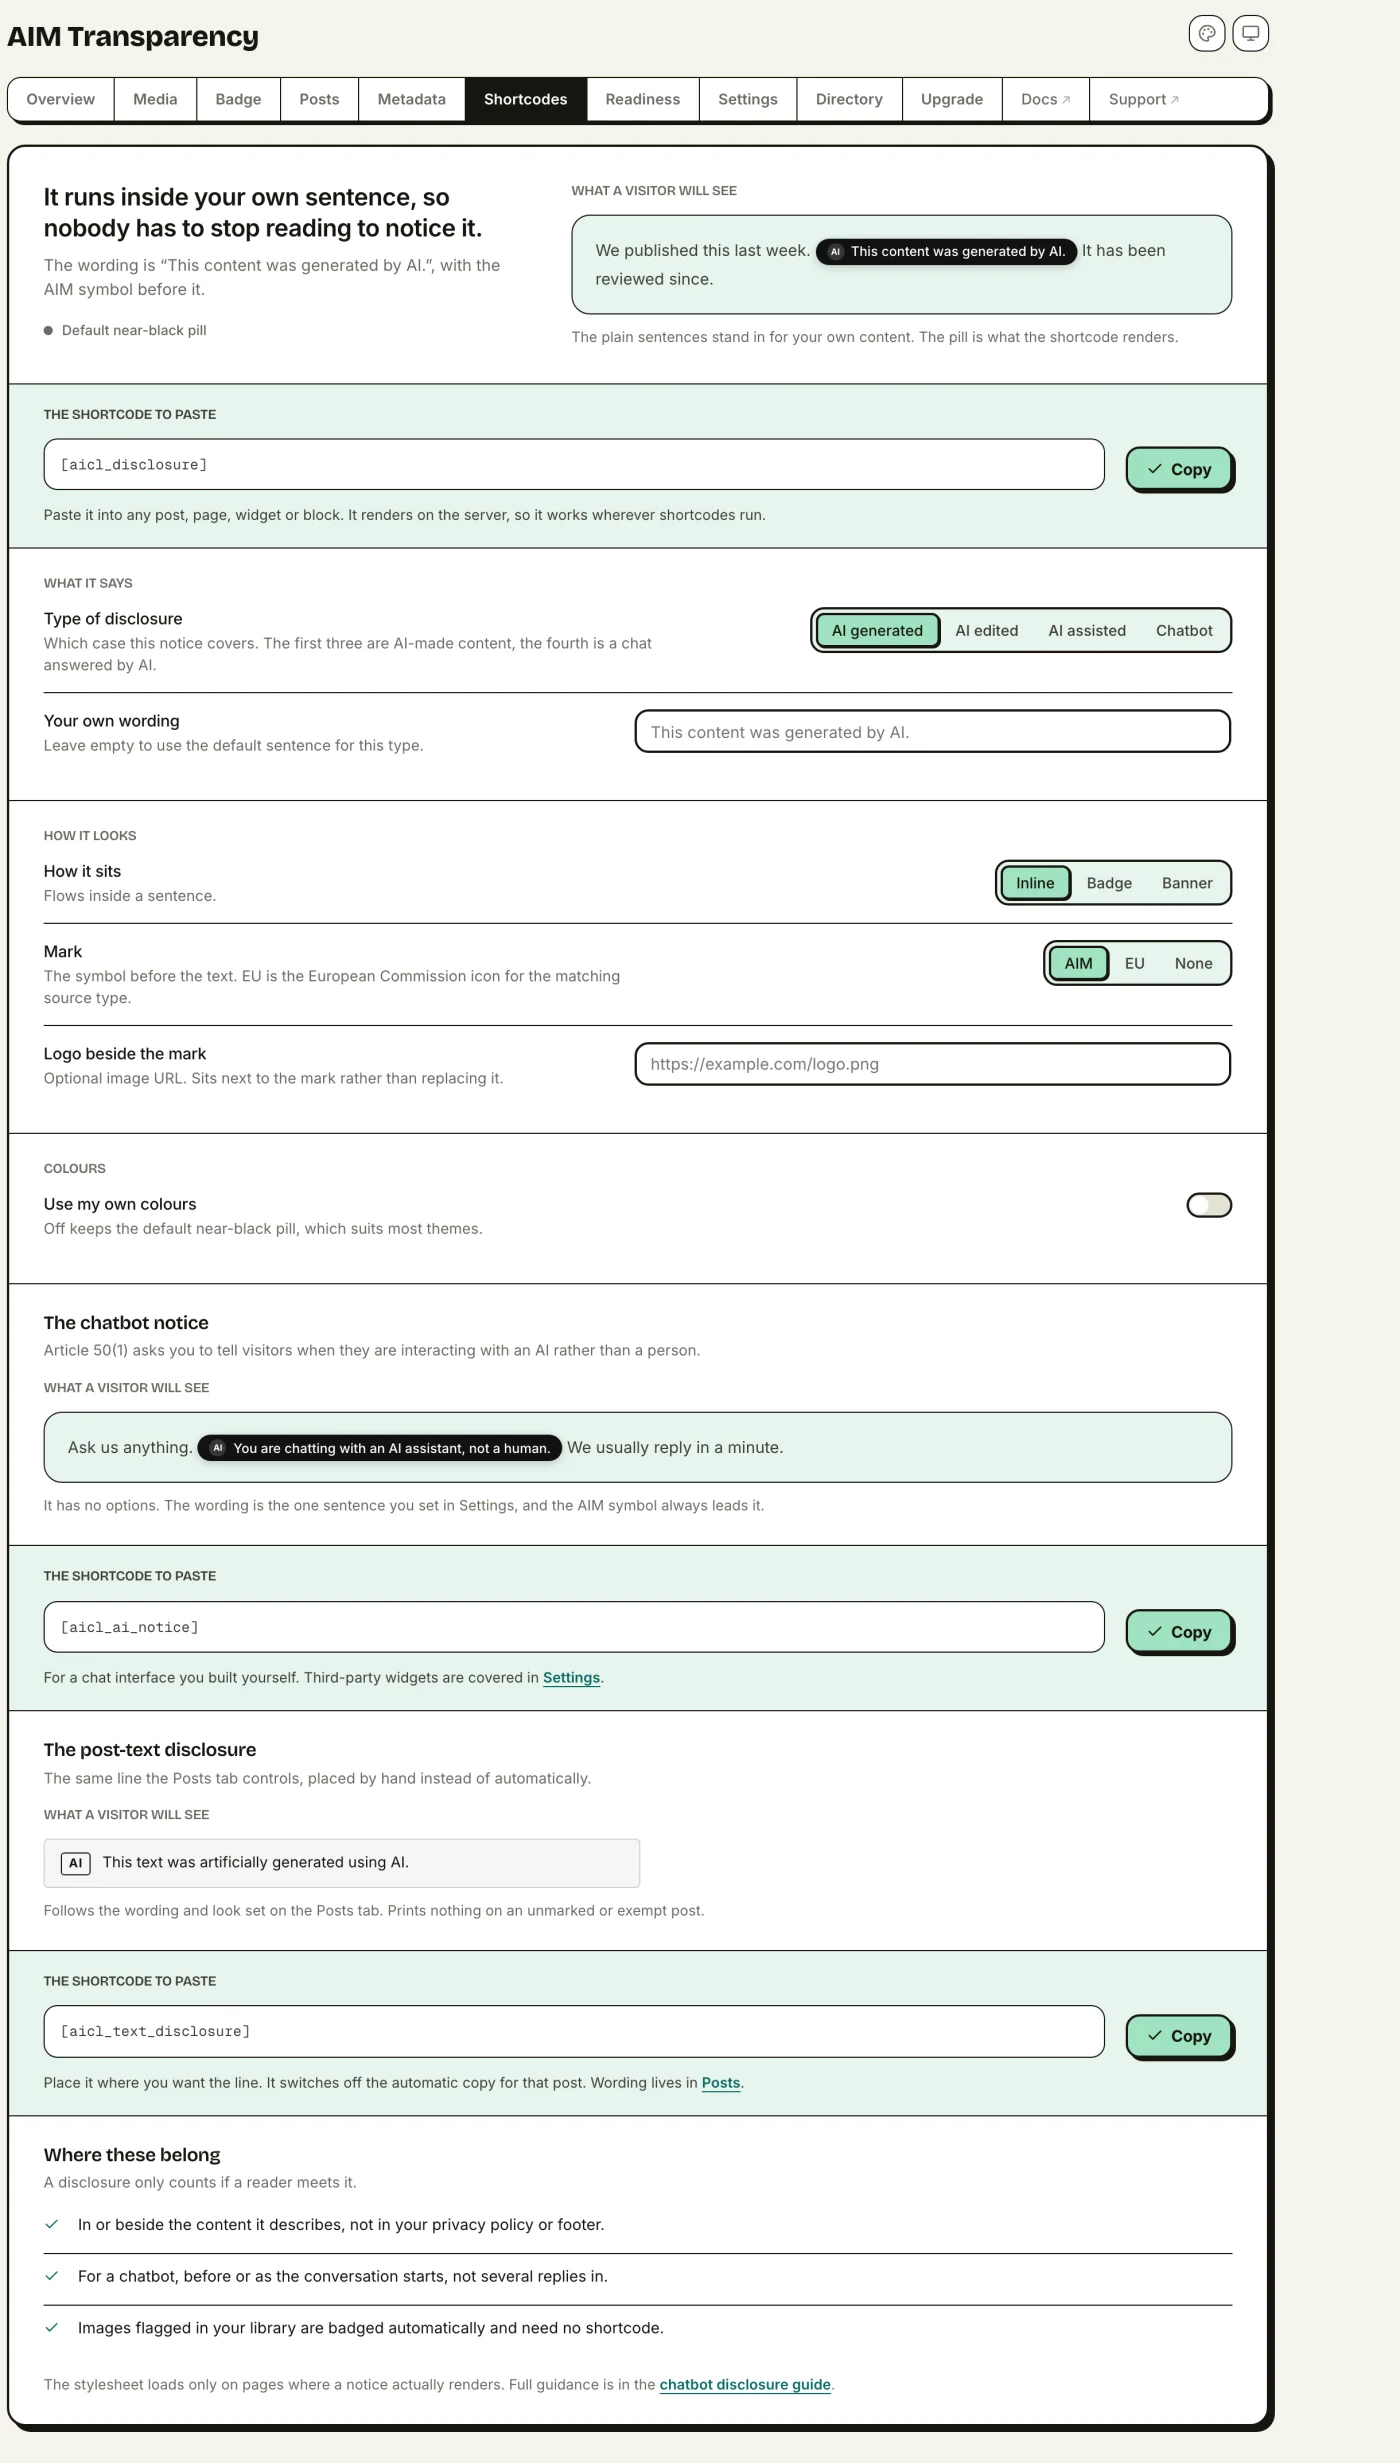
For example, [aicl_disclosure type="ai-edited" style="banner"] puts a full-width “This content was edited with AI” block wherever you place it, and [aicl_disclosure style="banner" text="Illustrations generated with Midjourney."] says it in your own words. The stylesheet only loads on pages where a notice actually renders.
Colours
Two more attributes take a hex colour, so the notice can match your theme rather than always being the default near-black pill:
| Attribute | Values | Default |
|---|---|---|
bg | Any hex colour, for example #0b0d12 | #111111 |
color | Any hex colour for the text | #ffffff |
The mark
The small glyph before the text. It is what tells a reader at a glance that this is an AI disclosure rather than ordinary copy.
| Attribute | Values | Default |
|---|---|---|
mark | aim (the built-in glyph), eu (the official European Commission icon for the matching source type), none | aim |
logo | An image URL, placed beside the mark | — |
mark="eu" uses the Commission's compact square mark, in the light or dark variant that suits your background. The wider “AI Generated” and “AI Modified” lockups are not used here: they already spell out their label, which the notice text is doing, and they would have to be distorted to sit inside a line of text.
The EU icon set labels AI-generated media, which is the Article 50(4) duty. There is no official icon for the Article 50(1) chatbot case, so
type="chatbot"uses the AIM glyph even if you ask foreu: borrowing an icon that means something else would misrepresent it. A logo sits next to the mark rather than replacing it, for the same reason: a brand logo does not tell anyone this is a disclosure.
The pair has to stay readable. If your background and text fall below the WCAG AA minimum of 4.5:1, the shortcode ignores both and renders the default instead. A disclosure nobody can read is not a disclosure, so this one is deliberately not up to the shortcode.
Building one without writing it
The dashboard has a Disclosure > Shortcodes panel: pick the type, the style, your own wording, colours and mark, watch it render, read the live contrast ratio, and copy the finished shortcode. It is the easiest way to see what each combination does before you commit it to a post.
Step by step, with the placement rules: how to disclose an AI chatbot on WordPress.
Compliance report
From the Metadata screen you can export a full record of every disclosed image (its file, source type, disclosure label, whether the tag was embedded, and its IPTC link) to keep on file for Article 50.
- CSV, free. A spreadsheet-ready list of every labeled image.
- Pro formats: JSON, Markdown, TXT, and a print-ready report you can save as PDF from your browser.
Strip-guard scan (Pro)
The Pro library scanner works in two directions, automatically each day or right away when you click Scan now:
- Strip-guard: image optimizers and content delivery networks (CDNs) sometimes strip metadata out of files later on. The scanner checks your flagged images and writes the tag back into any that lost it.
- Discovery (Pro 1.2.0): images uploaded before the plugin was installed never met the upload-time auto-flagger. The scanner reads your unflagged library for a declared
DigitalSourceType(PIM-stamped masters, C2PA-signed camera files, AI-tool output) and adopts the declared value as the flag, so an existing library heals retroactively. Files that already carry the tag are left byte-for-byte untouched; each image is inspected once, so big libraries progress batch by batch.
EU AI Act readiness (free)
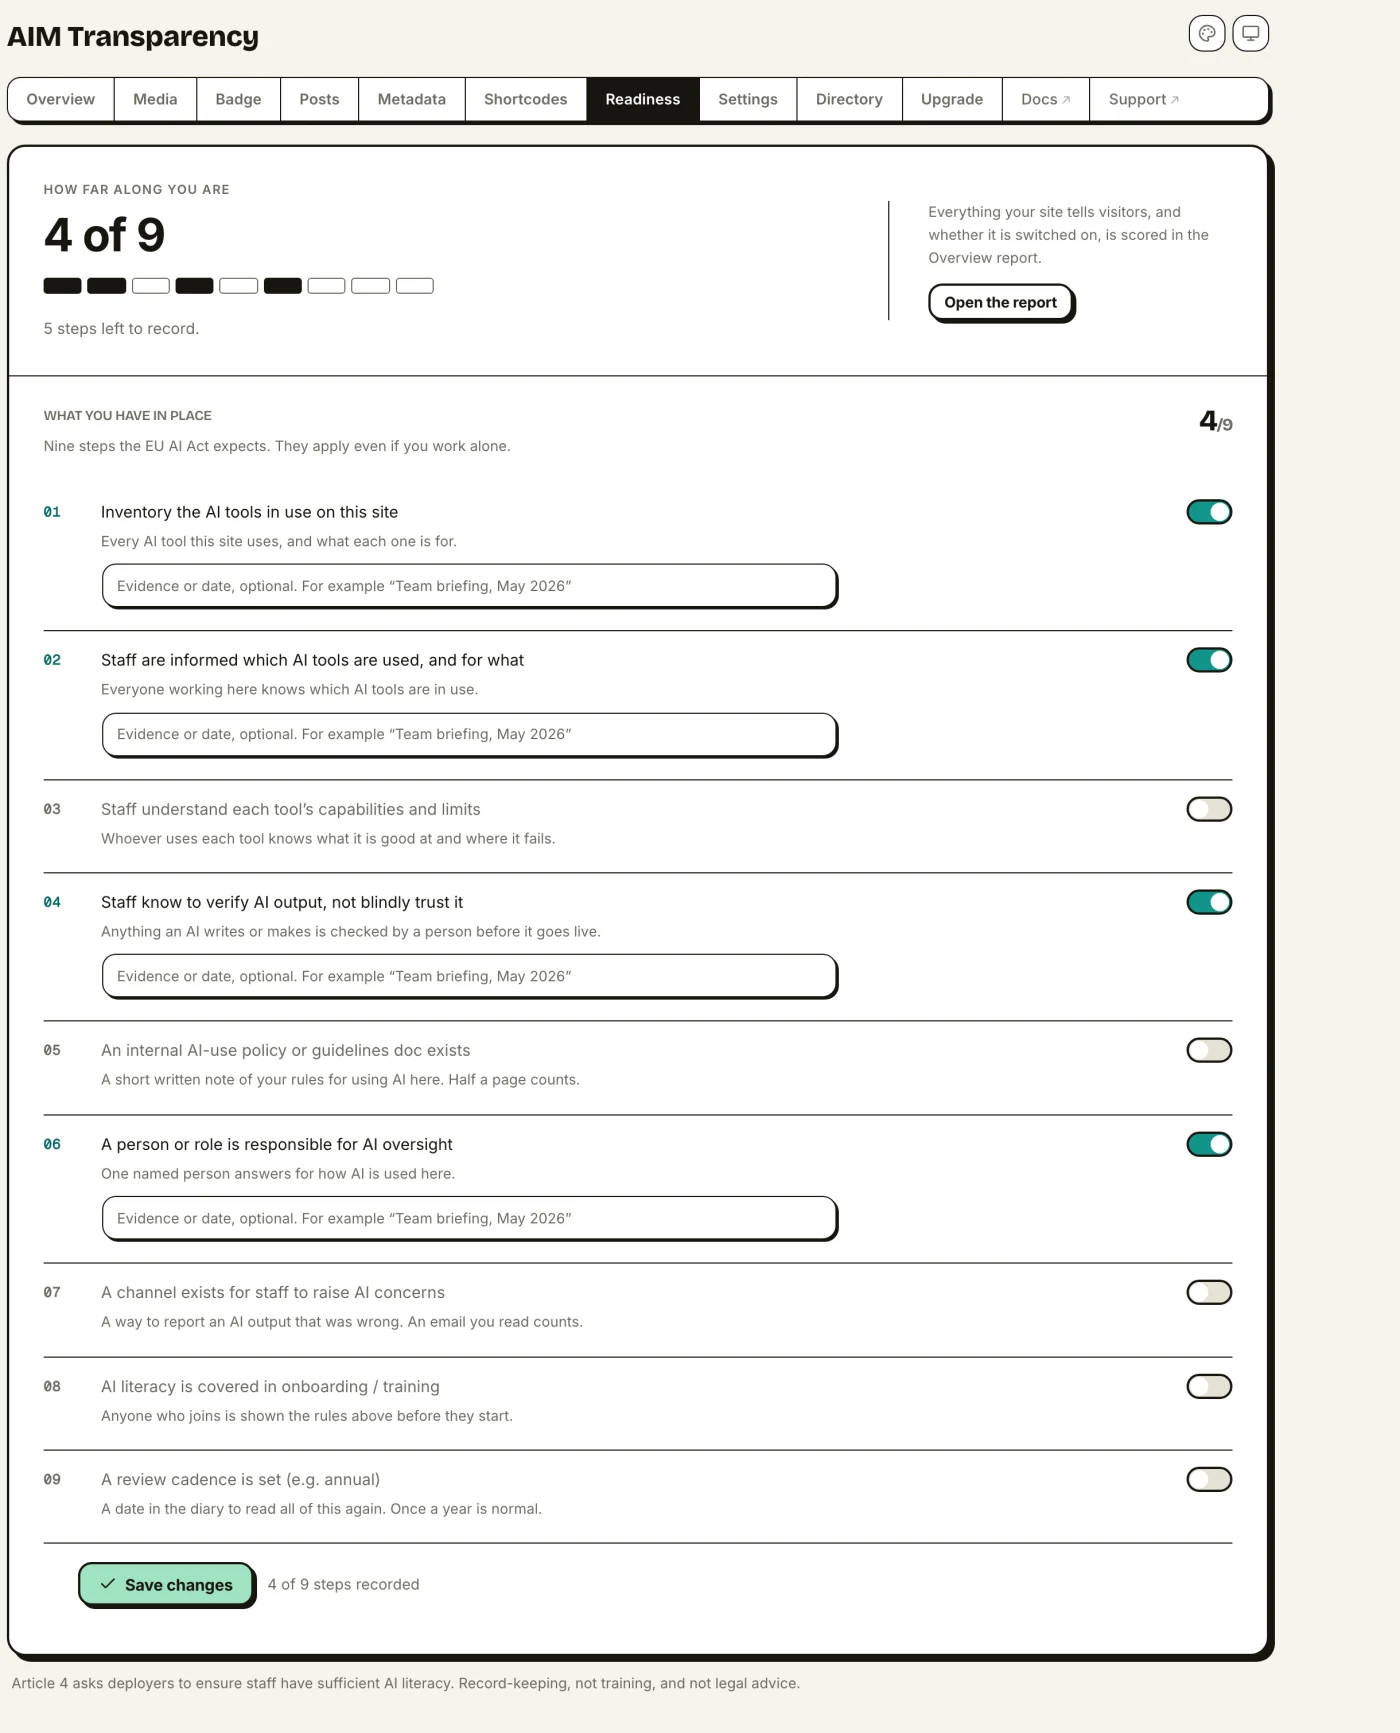
The Readiness tab holds one thing: your Article 4 AI-literacy record, a checklist of nine steps you tick off and can annotate with a date or a note. It shows how many of the nine you have recorded and nothing else.
Everything scored automatically from your live setup, including your Article 50 image disclosure, is on the Overview report instead, where it is stated as findings you can act on. The two screens used to open looking almost identical; they no longer overlap.
Article 50 moved to Overview
Your image disclosure is read straight from your live setup (visible badge on, metadata embedded, JSON-LD switched on, and at least one image disclosed). That reading is on the Overview report, not here, so it stays accurate without you entering anything by hand and without two screens saying the same thing.
Article 4: AI literacy
Article 4, in force since 2 February 2025, asks anyone using AI systems to make sure their staff have enough AI literacy: knowing which AI tools the team uses, what those tools can and can’t do, and how to read their output. This is an organisational duty, not a website feature, so AIM Transparency gives you a checklist to record and show your work: a tool inventory, staff awareness, an AI-use policy, an owner for oversight, a way for people to raise concerns, training, and a regular review.
Each item has an optional note where you can add evidence (for example, a training date), and each one you complete adds to your readiness score, handy for an internal audit or a review with stakeholders.
The checklist is record-keeping, not training, and not legal advice. Article 4 compliance remains the deployer’s responsibility.
Pro features
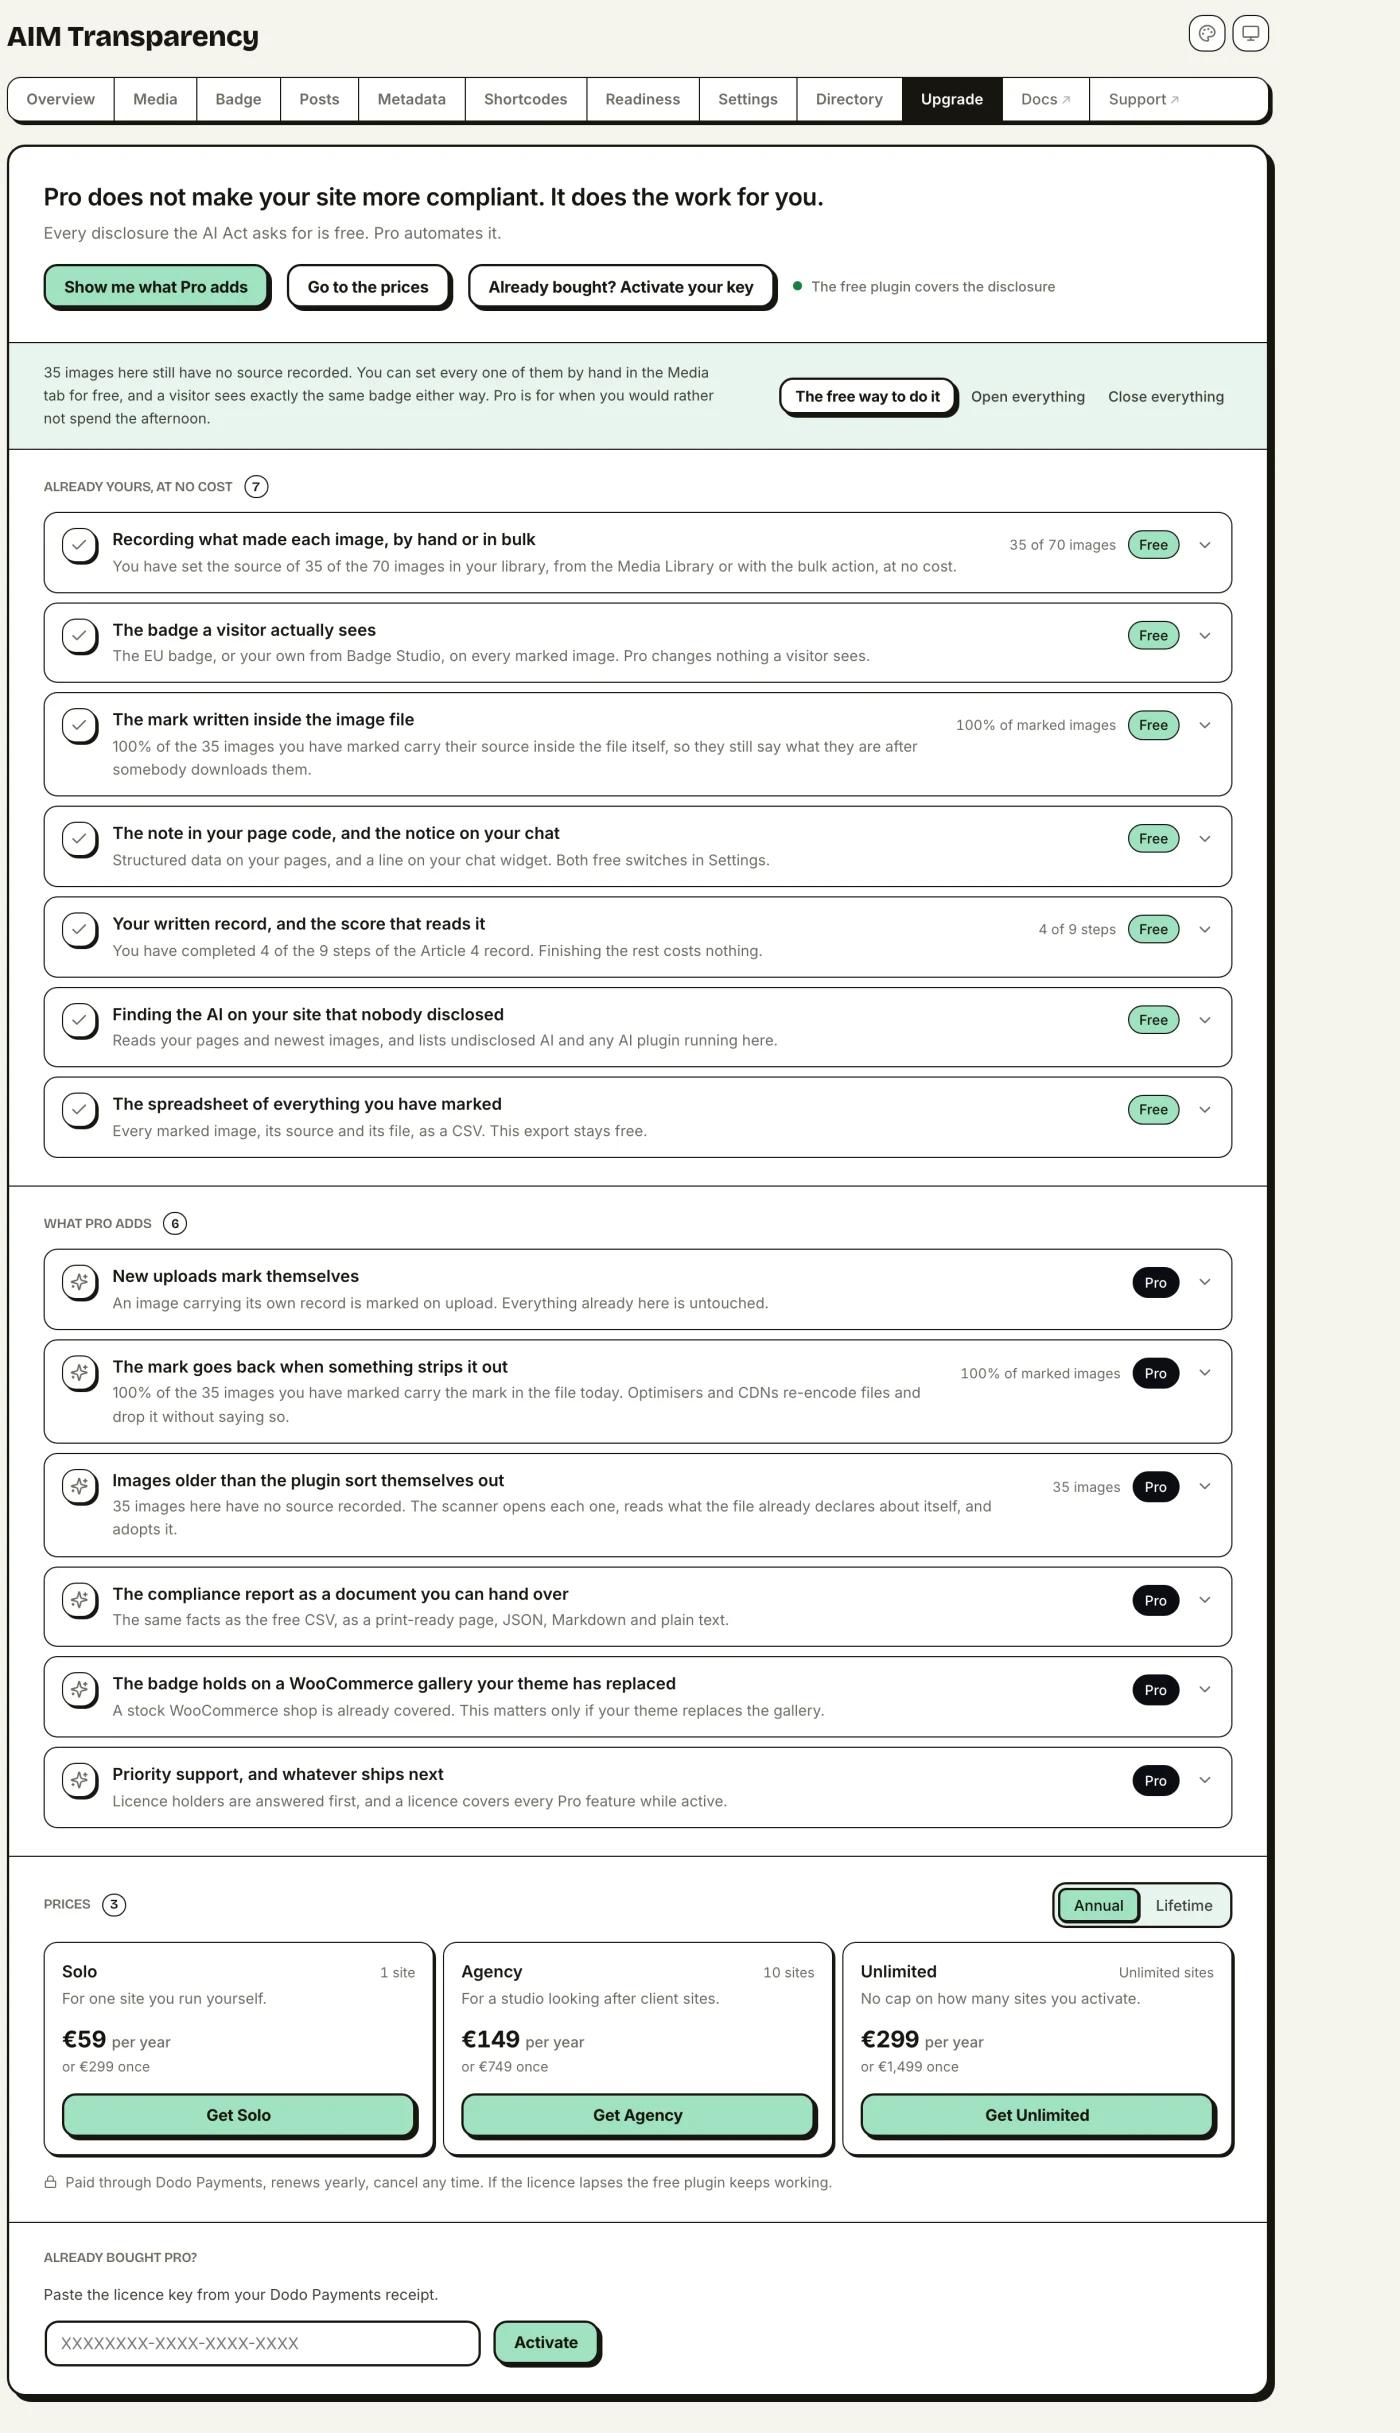
The free plugin covers the whole disclosure stack: manual flagging, the official EU AI-content badge, Badge Studio for custom designs, IPTC/XMP embedding for every image format, JSON-LD, and a CSV compliance export. AIM Transparency Pro is an optional add-on that automates and extends it:
- Automatic flagging: detect AI images on upload from their embedded C2PA / IPTC provenance.
- Library scanner: a strip-guard that writes the tag back into any image an optimizer stripped it from, plus retroactive discovery: existing, unflagged images whose files already declare a source type are flagged automatically.
- Compliance report: a print-ready report you can save as PDF, plus JSON, Markdown and TXT exports.
- WooCommerce cover: keeps the gallery badged on themes that replace WooCommerce’s own gallery template. Stock stores are already covered by the free plugin.
Upgrading to Pro
Pro installs alongside the free plugin as a separate add-on: you keep everything you already have and unlock the extras above. Start to finish it's four steps:
- Choose a plan & check out. Open the Upgrade screen in the AIM Transparency dashboard (or the Pricing section on this site), pick the plan that matches how many sites you run, and complete the purchase through Dodo Payments, our secure checkout.
- Get your download & key. Right after checkout, Dodo Payments emails you your order. Your plugin download and license key arrive as two entitlements: click Access in your Customer Portal in the email (or View Details), then in the portal open the Digital Files entitlement to download
aim-transparency-pro.zipand the License Key entitlement to copy your key. You can return to the portal any time. - Install the add-on. In wp-admin go to Plugins → Add New → Upload Plugin, choose the
aim-transparency-pro.zipyou downloaded, then Install Now and Activate. Keep the free AIM Transparency plugin active: Pro runs on top of it, it doesn't replace it. - Activate your license. Back on the Upgrade screen in the dashboard, paste your license key and click activate. Pro unlocks across the dashboard right away, and the key ties to your plan's site limit.
Lost your download or key? They're always in your Dodo Payments Customer Portal: the link is in your receipt email. To move Pro to a different site, deactivate the license on the old site's Upgrade screen first (each plan allows a set number of active sites).
WooCommerce product images
On a WooCommerce store, the badge appears on flagged product images everywhere WordPress renders them: shop and category thumbnails, the product description, related products, the cart, and the gallery on a single product page. All of that is the free plugin, because WooCommerce builds its gallery with WordPress’s own image functions. Pro adds a safety net for themes that replace that gallery template with their own markup, where the standard hooks never run.
Settings & theme coverage
The plugin plugs into WordPress’s own image and template functions (including render_block for block and full-site-editing themes), so any theme built the standard way is covered automatically.
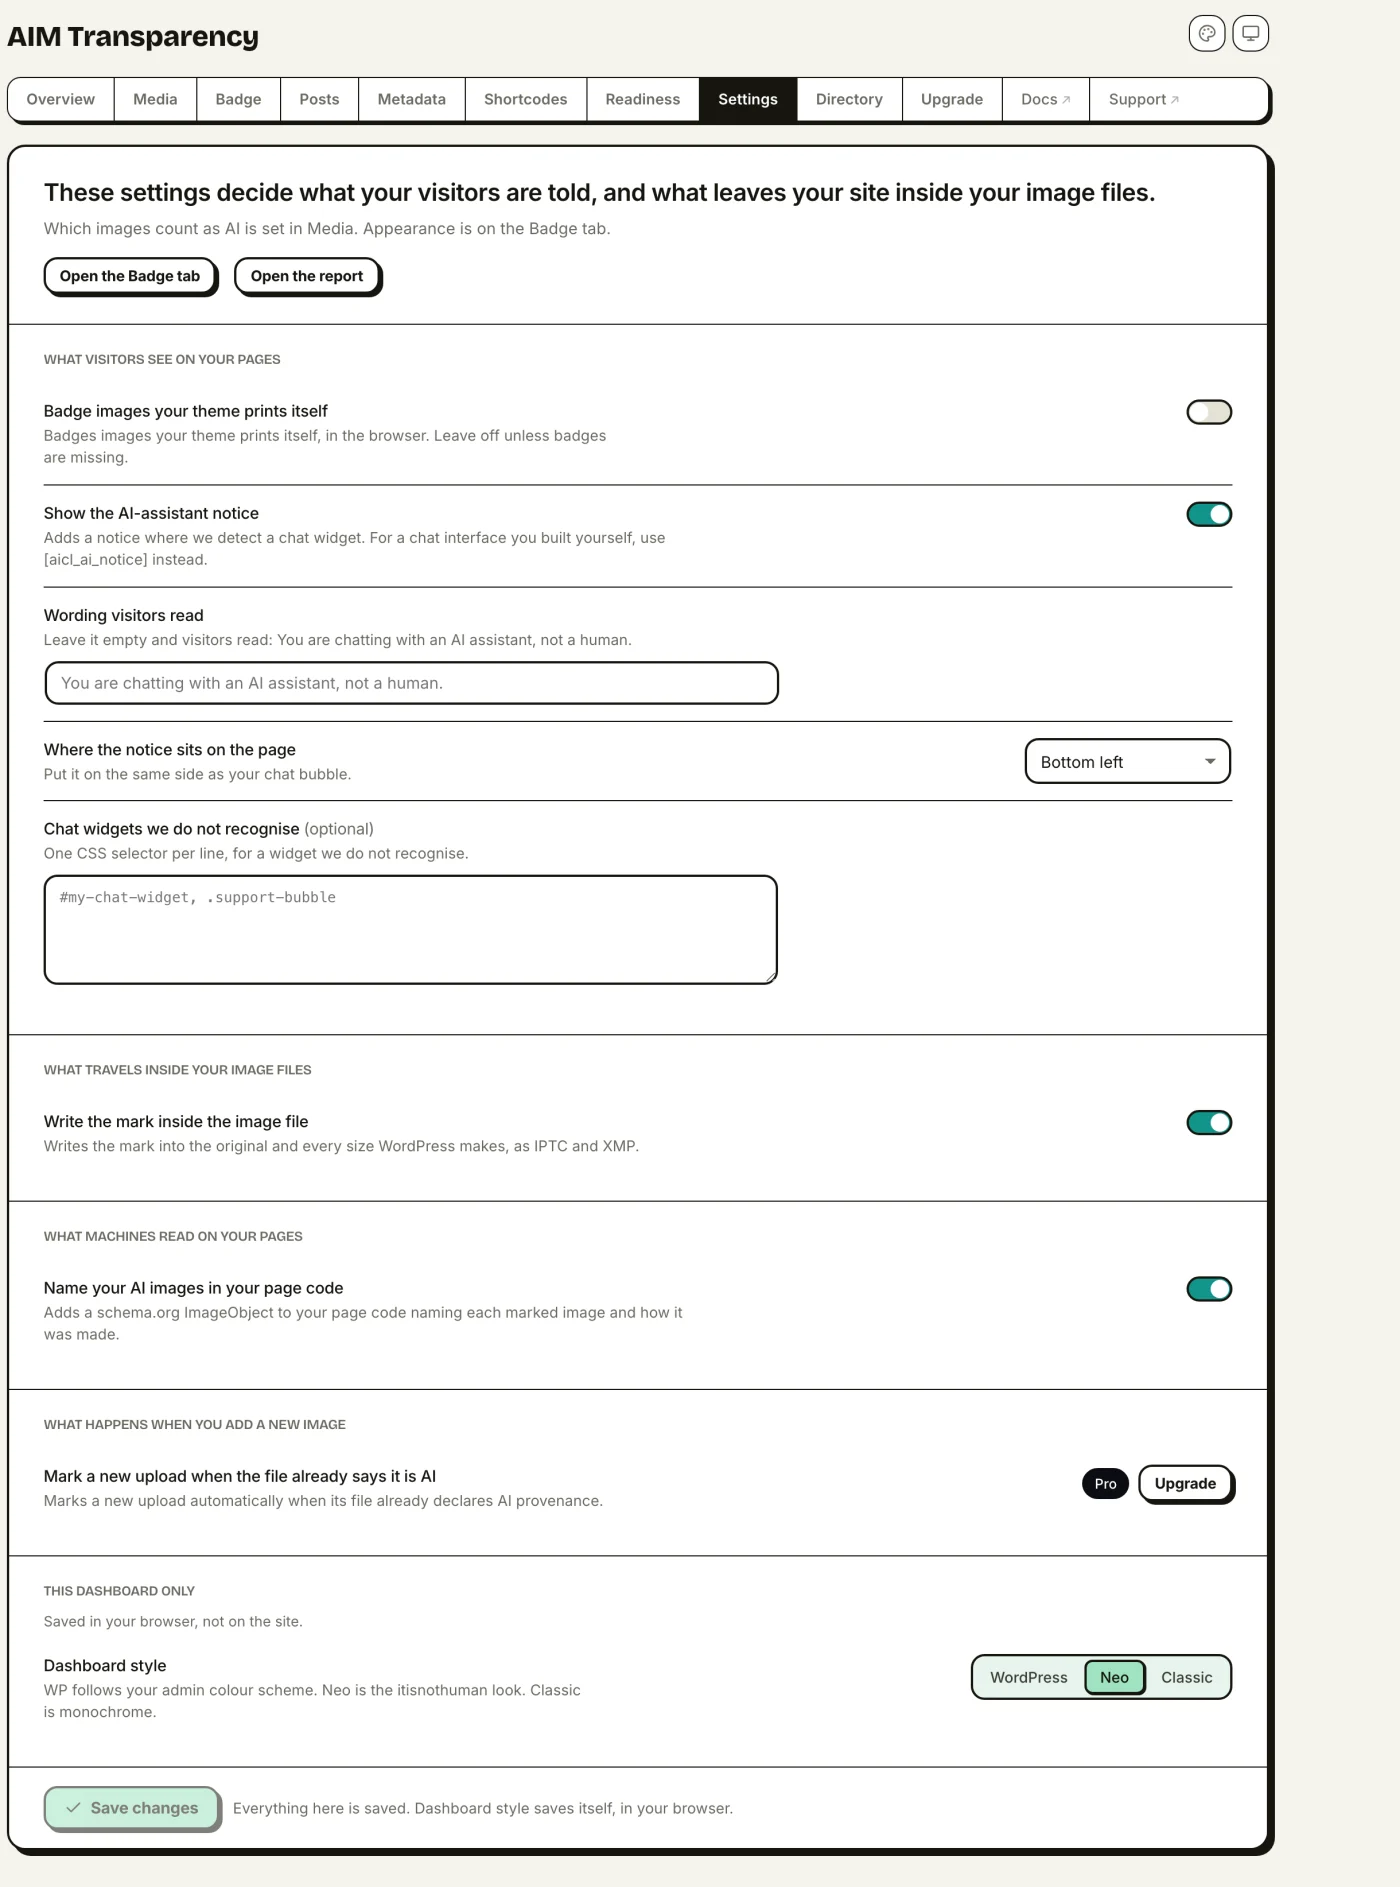
If your theme writes its own <img> tags instead, turn on Universal badge coverage in Settings. This adds the badge to any image whose file matches one you’ve flagged. It only shows badges: it never detects or tags images on its own (that’s Pro’s auto-detection).
In Settings you can turn each layer on or off on its own: the visible badge, the file embedding, and the JSON-LD. With Pro, you can also switch automatic flagging on or off under Automation.
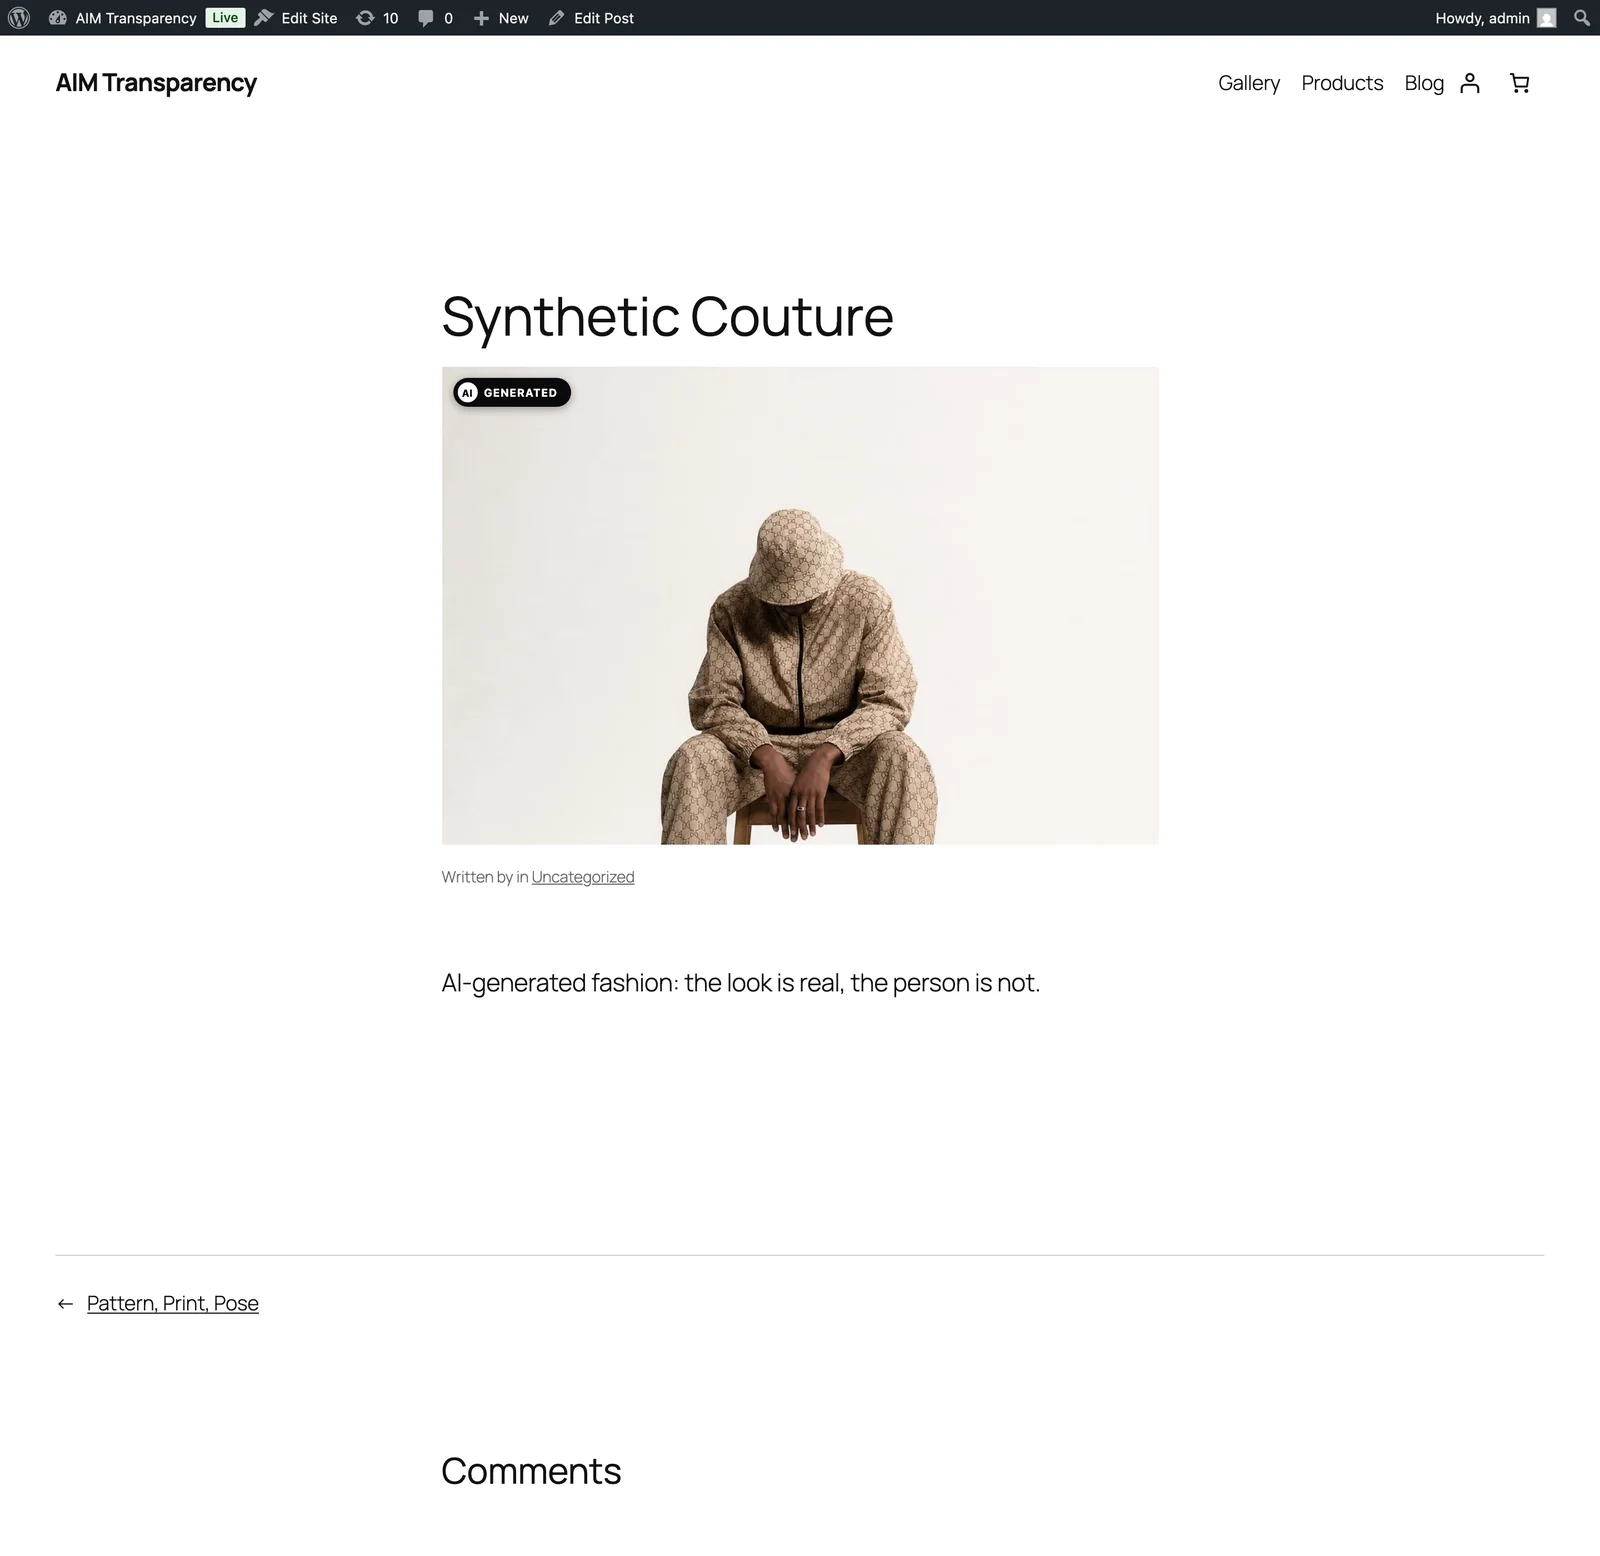
AIM Transparency Directory
The Directory is optional and off by default. If you opt in, your site can be listed publicly as one that discloses AI content. Nothing is shared unless you agree to it: you choose to submit your site name and address, how many images you’ve labeled, and your plugin and WordPress version. You can remove your listing at any time from the dashboard; the removal guide covers the badge, uninstalling and what gets deleted.
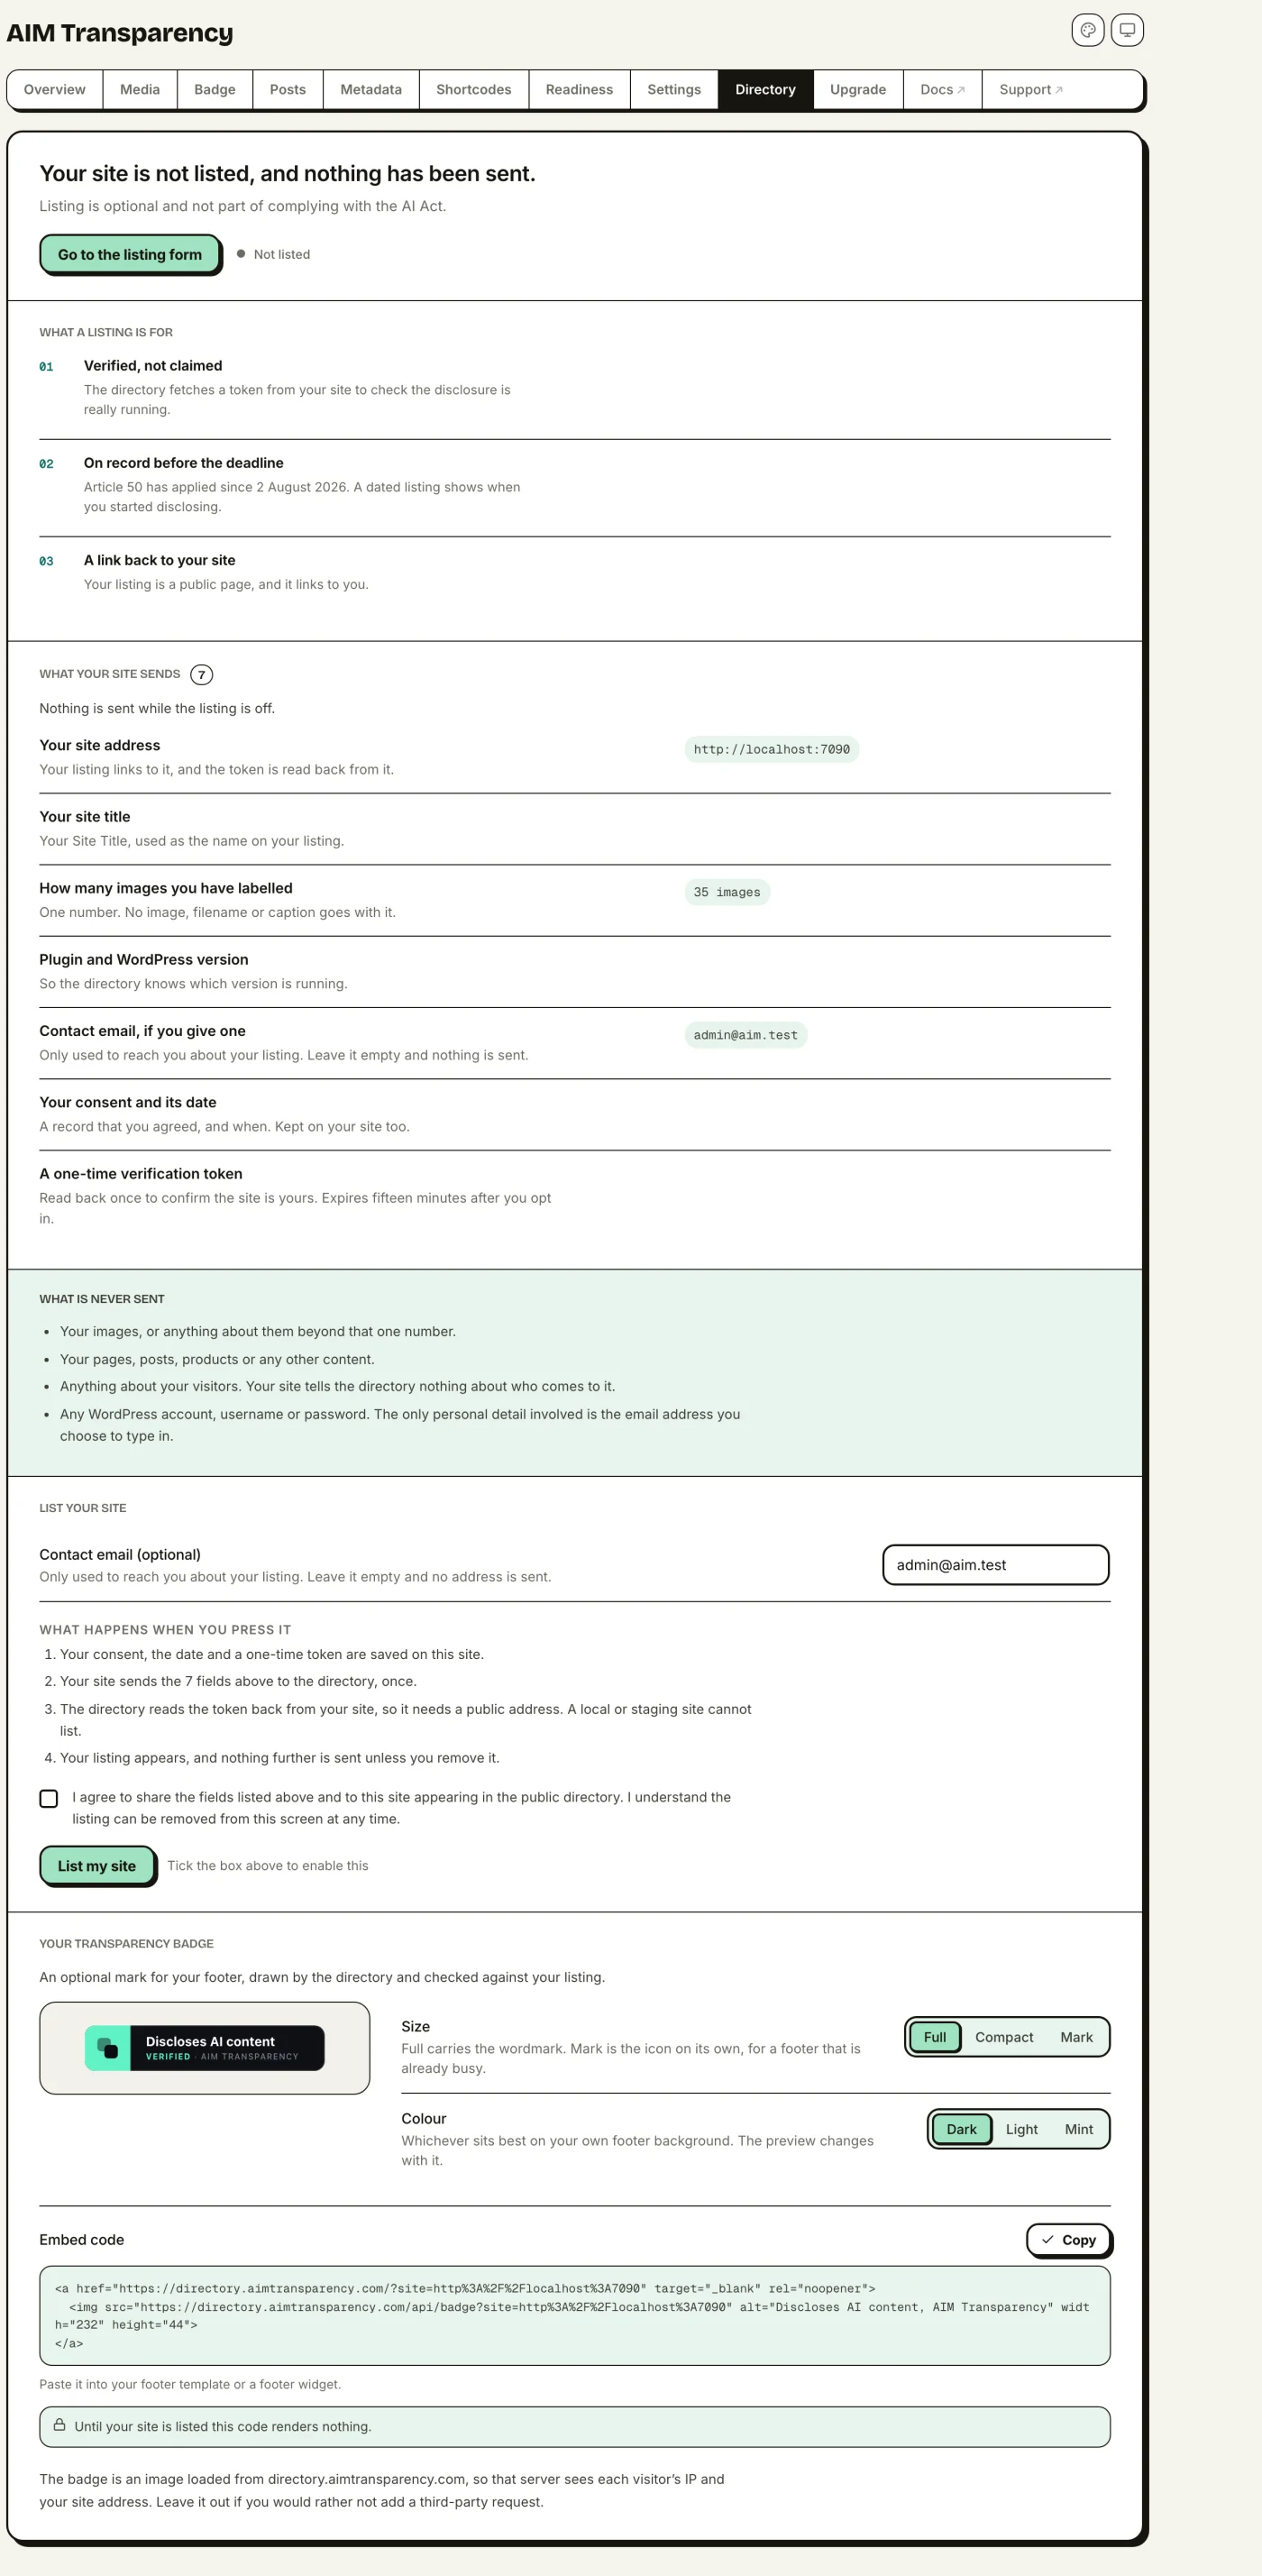
Why list your site?
- Verified, not just claimed. Before it lists you, the directory verifies you control the site and asked to be listed (an automated token handshake with the plugin), so a listing carries more weight than simply saying so. Link to it as proof that you label AI content.
- Early-adopter credibility. Be publicly on record disclosing AI content ahead of the 2 August 2026 deadline: a useful position for agencies and brands.
- A backlink to your site.
Honestly: the directory gets more valuable as more sites join, so early on this is as much about backing transparency as getting an immediate return.
Listings are self-declared: a listing is not a certification, and it isn’t an endorsement that you comply.
Languages (free)
A disclosure only informs someone if it is in a language they read. Everything a visitor sees is translated into 22 of the EU’s 24 official languages, and so is the whole admin dashboard.
What is translated
- The badge on the image, including every source type (AI Generated, AI Modified, Camera Photo, Human Created and the rest).
- The disclosure box that opens when a visitor clicks the badge, and its explanation text.
- The chatbot notice, both the shortcode and the optional floating notice.
- The
[aicl_disclosure]defaults, so a notice you place in a post reads correctly without you writing it out per language. - The admin dashboard: every tab, the Media Library controls and the Article 4 readiness checklist.
The languages
Bulgarian, Croatian, Czech, Danish, Dutch, English, Estonian, Finnish, French, German, Greek, Hungarian, Italian, Latvian, Lithuanian, Polish, Portuguese, Romanian, Slovak, Slovenian, Spanish and Swedish.
Irish and Maltese are the two official EU languages WordPress itself does not ship a translation set for, so the plugin cannot ship them either. When WordPress adds them, we will.
Where the wording comes from
The legal terms are not ours to choose. Regulation (EU) 2024/1689 exists in all 24 official languages and every version is equally authentic, so each language takes its wording from its own official text of the Regulation rather than from a translation of the English. This matters more than it sounds: the French text reserves manipulé for the deepfake case, so using it for any AI-edited image would make a heavier claim about someone’s work than the law does.
Setting it up
There is nothing to configure. The plugin follows your site language (Settings › General › Site Language), and each visitor-facing string switches with it. On a multilingual site the disclosure follows whatever locale the page is being served in.
Translations ship inside the plugin, so they work before a wordpress.org language pack exists. If a language pack is later published for your locale, WordPress uses that one instead.
Multilingual sites (free)
Twenty-two languages covers what the plugin says. A multilingual site adds a second question: does a disclosure survive being translated?
Polylang
Tested, and fixed. The badge, the disclosure wording and the chatbot notice follow the language the visitor is actually reading. More importantly, a source type you set on an image is carried to that image’s translated copies, so the badge does not vanish on a translated page when media translation is switched on. That was the failure this was built and tested for.
WPML
Not tested yet. The integration uses WPML’s own documented configuration file and API, so it is built for it, but we have not run it against a real WPML install and will not claim it works until we have. If you use WPML, tell us how it goes: support@aimtransparency.com.
The configuration file
The plugin ships a wpml-config.xml, which Polylang and WPML both read. It does two things: it marks the source-type fields to be copied to translations, and it exposes any badge or notice wording you have typed yourself for string translation. Leave that wording empty and the built-in text is used, already translated into 22 languages.
If you have typed custom badge wording, it is yours to translate. If you have not, you get all 22 languages for free.
Dashboard themes (free)
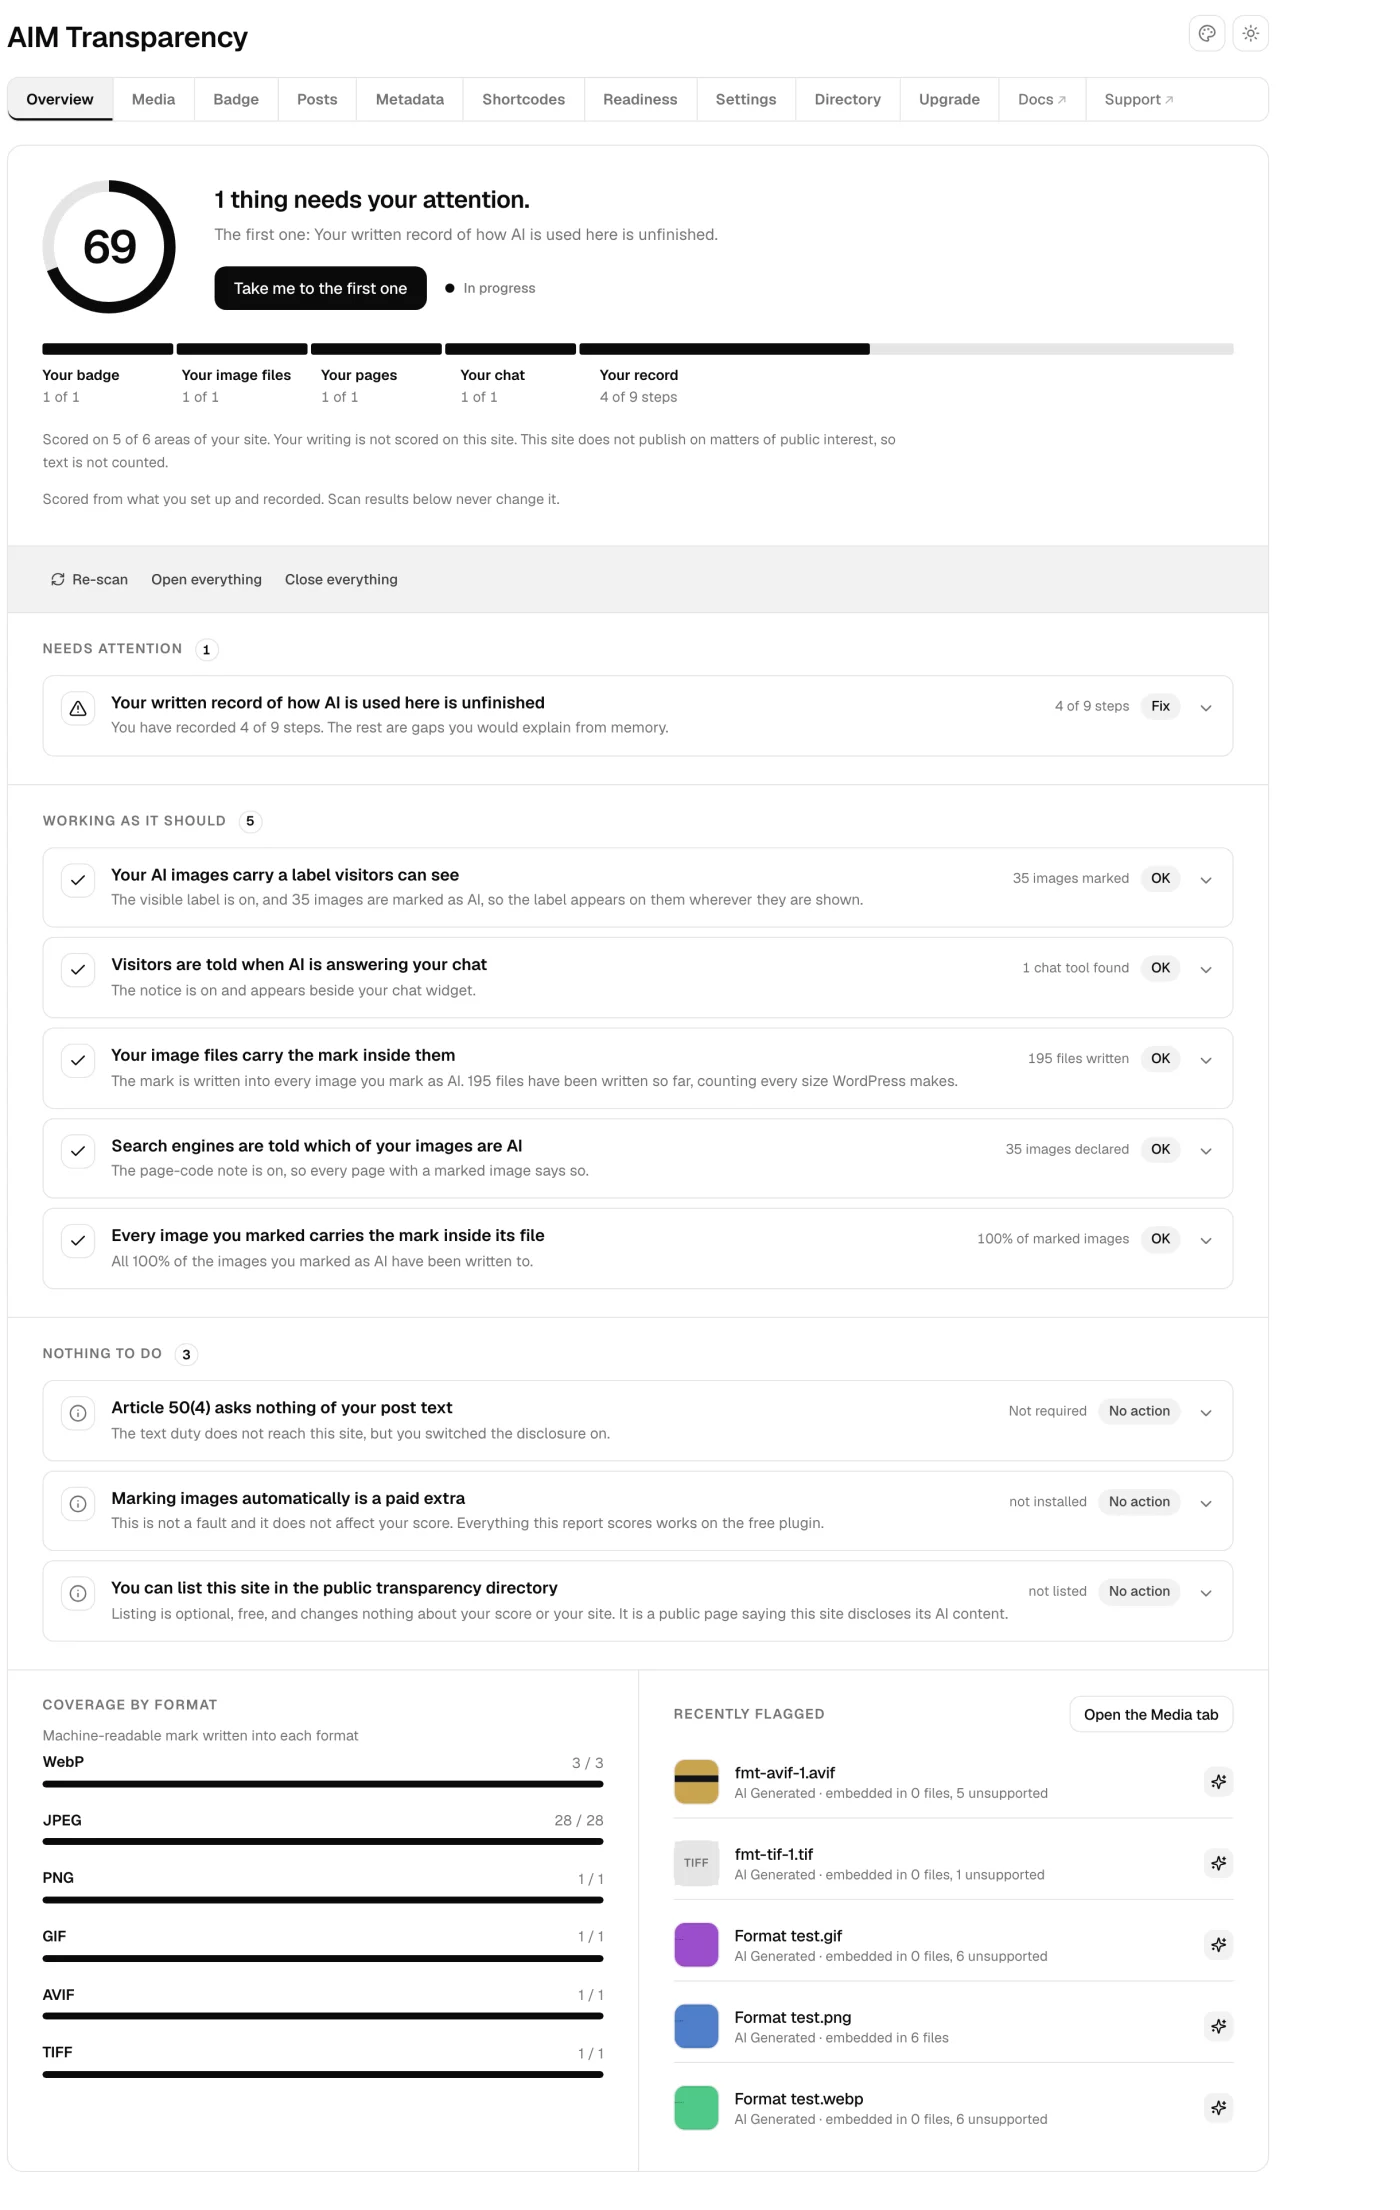
The dashboard ships in three looks. Switch between them from the palette button in the top right of any screen.
- WordPress is the default on a new install. It is built from the same container, heading and tab strip as every core settings screen, and it reads your admin colour scheme from Users › Profile, so it matches whatever the rest of your admin already looks like.
- Neo is the studio look: warm cream, deep teal, drawn edges.
- Classic is quieter and more typographic, with a serif display face.
All three carry the same screens and the same data. Each one also has a light and a dark mode, following your system setting unless you pick one.
If you have already chosen a theme, updating the plugin never changes it under you. The WordPress default applies to installs that have not picked one.
FAQ
What language will my visitors see the badge in?
The translation in my language reads wrong. Can I report it?
Does it work with Polylang or WPML?
Does the badge alone make me compliant?
Will it modify my images?
Can I use my own badge instead of the EU icons?
Does it detect AI images automatically?
Can I export a record of what I’ve labeled?
What’s free and what needs Pro?
Is the plugin really free?
What is Article 4, and does the plugin help?
Will it work on my theme?
<img> tags, turn on Universal badge coverage in Settings to badge them by filename.Does it cover WooCommerce?
What about WebP, AVIF and HEIC?
My images are not AI. Is this still useful?
digitalCapture), Human Created (digitalCreation, 3D renders and digital art made without generative AI) or Composite (a non-AI mix such as photos plus renders). The standard IPTC value is embedded in the file and mirrored in JSON-LD, with no badge by default: a machine-readable answer to “was this AI?” for work that was not. If your files arrive already stamped, from a camera, a PIM or a DAM, Pro adopts the declared value automatically on upload, and its library scan does the same for images already in your library.